
 Sound Mill X3 : User's Guide
 Contents
 Language
 Product Home
Automator - Automation Manager
 Page Bottom
Automator main window
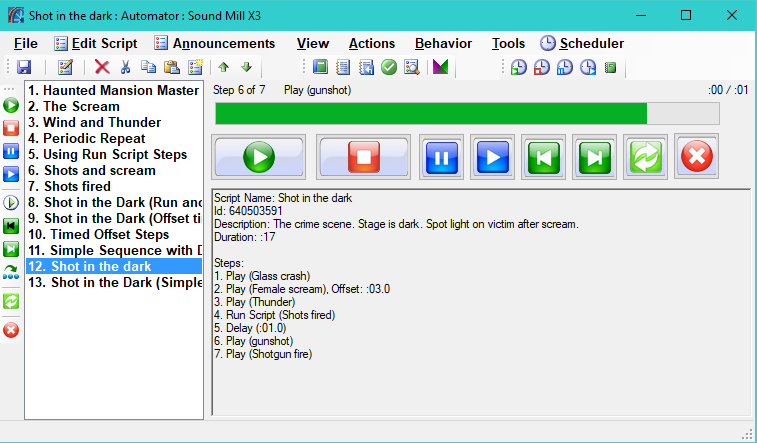
The Automator is composed of a list of Scripts (left hand column), a run progress bar, a set of over-sized Run controls buttons and a panel that shows a summary description of the current selected Script.
Now Playing Screen (Optional)
A Now Playing Screen can be exposed to show music MP3 tags (Song Title, Artist, Album Name) and Album Artwork when playing music playlists. If you don't want to see it or you need the space for edit work, simply hide the panel.
Run status information
- - The Run status information is displayed just above the progress bar.
- Step number executing - The currently executing Step and number of Steps.
- Step name executing - The name of the Step that is executing.
- Play time position - Time position within the current playing Sound Item for Play Steps.
- Audio length - The time length of the current playing Sound Item for Play Steps.
 To Page Top
File menu
- Save - Saves the SoundList including automation Scripts.
- Export Selected Script to M3U Playlist - The selected Script is Exported to a M3U Playlist. Pops up a File Save dialog so you can specify the save folder and filename. It will prompt to Replace if the filename already exists. You can specify the path type to use (Absolute vs Relative path) -- see Playlist Option > Export M3U Playlists with Full File Paths.
- Exit - Closes the Automator window.
Edit Script menu
The Edit Script Menu has the following functions. Some edit funtions use an Automator 'clipboard' similiar to the Windows clipboard, but they do not affect the contents in the Windows clipboard. The list is renumbered when actions add, delete or move items in the list.
- Edit Script - Loads the selected Script into the Script Editor.
-
Change Id - Changes the Identifier (
 Id) of the selected Script. A dialog is popped up so that you can enter the new Id. You should read the section on Ids before using this action. Turn on (check)
Show Ids
in the Report Options then run a Sound List Report to see all current Ids.
Id) of the selected Script. A dialog is popped up so that you can enter the new Id. You should read the section on Ids before using this action. Turn on (check)
Show Ids
in the Report Options then run a Sound List Report to see all current Ids. - Undo Cut - Restores a previously cut Script from the Undo stack.
- Delete - Deletes selected Script from the list. Deletes cannot be restored and are not placed in the clipboard or on the Undo stack.
- Cut - Deletes selected Script from the list. Replaces the contents of the clipboard and saves the cut item on Undo stack.
- Copy - Copies selected Script into the clipboard.
- Paste - Pastes a Script from the clipboard to the Script list at the selected position. The list is renumbered. A sequential index number is added to the end of the Script Name to make it unique.
- New Empty Script - Adds a new Script to the Script list at the selected position. The new item will be populated with the current Default values.
-
New Script - Music Playlist - A new script is created as a simple sequential playlist of music selections. It contains one Play Step for each selected Sound Item.
- Using All Sound Items - All Sound Items in the Sound List are added to this playlist.
- Using Selected Sound Items - You are prompted to select multiple Sound Items to include in the playlist.
- New Script - Music Selections - Creates a Script of Music Selections with one Play Step for each selected Sound Item.
- New Play All Script - Adds a new Script to the Script list at the selected position. It will be pre-populated with Play Steps for all Sound Item in the Sound List.
- Move Up - Moves selected Script up the list by one position.
- Move Down - Moves selected Script down the list by one position.
- Move to Top - Moves selected Script to the Top of the list.
- Move to Middle - Moves selected Script to the Middle of the list.
- Move to Bottom - Moves selected Script to the Bottom of the list.
-
Favorite Script Attributes -
- Set Selected from Favorites - Sets the Attributes of the current selected Script from your current Favorite. Script Name and Script Steps are NOT included with Favorite. Use Copy/Paste if you want to copy Steps as well.
- Save Selected as Favorites - Saves the values of the current selected Script as your Favorite.
-
Scripts Schedules - After modifying Script Schedules, you can see a summary of which schedules are currently enabled by clicking the Scheduler > View Scheduler Report menu.
- Schedules from Favorite - Sets the Schedule of one or multiple Scripts from the Favorite Schedule. You are prompted to select the Scripts to apply the change to.
- Enable Schedules - Enables the Schedule of one or multiple Scripts. You are prompted to select the Scripts.
- Disable Schedules - Disable the Schedule of one or multiple Scripts. You are prompted to select the Scripts. Disabling maintains your schedule customization should you enable it later.
- Delete Schedules - Deletes the Schedule of one or multiple Scripts. You are prompted to select the Scripts to apply the change to. Deleting a Schedule completely removes it and Schedule customizations will be lost. If you want to save your customizations use Disable instead.
-
Script(s) Offset Times
- Enable / Set to - Enables the use of the Repeat After Offset Time for selected Scripts. You are prompted to select: 1) Offset Time to set to; 2) the Scripts to apply the changes to.
- Disable - Disables the use of the Repeat After Offset Time for selected Scripts. You are prompted to select the Scripts to apply this changes to.
Move Script tool bar button behavior
Edit Script tool bar
Edit Script tool bar
Edit Script tool bar buttons (Figure 2, from left to right): Save Sound List, Edit Script, Delete , Cut, Copy, Paste, New, Move Up, and Move Down .

Announcements menu
These menu items provide a productivity aid for you to quickly create different types of Announcement and Music Scripts from your Sound Items. You can create the Script Using All Sound Items or select a subset of Sound Items by clicking the Using Selected Sound Items menu item. You could use the Script Editor to create any of these Scripts but these menu items offer a quick method to ensure all the necessary settings are set. When the Script is marked as any type of Announcements, all Play Steps in the Script are treated as Announcements. You can also set a master Pre-Delay and Post-Delay for all Announcements in the Options dialog Automation tab.
- New Script - Insert Announcements - Creates a Script of Insert Announcements with one Play Step for each selected Sound Item.
- New Script - Interval Announcements - Creates a Script of Interval Announcements with one Play Step for each selected Sound Item. The Interval is set from the interval time amount is specified in the Announcements Interval Time in the Options dialog Automation tab. You can change the interval time on each Script.
- New Script - Offset Timed Announcements - Creates a Script of Offset Timed Announcements with one Play Step for each selected Sound Item. Play Step Offset times are set to increments of the interval time mentioned above. Once created, you can use the Script Editor to adjust each Step Offset.You can theUse this option
- New Script - Scheduled Announcements - Creates a Script of Scheduled Announcements with one Play Step for each selected Sound Item. The first Step is scheduled at the Scheduled Time in the Options dialog Automation tab. Subsequent Steps are scheduled in increments of the interval time mentioned above.
- Interval Announcements Grouping - Sets the number of Interval Announcements that will play when the time interval arrives. See Interval Announcements for more detail.
- Insert Announcements Grouping - Sets the number of Insert Announcements that will play when the Insert time arrives. See Insert Announcements for more detail.
- Clear Announcements (All) - Clears all current running Announcements and all Announcements scheduled to run at a later time. Useful if you want to manually stop any programmed announcements from playing but leave a music playlist running. See the Clear Announcements section for more details.
- Clear Announcements (Running Only) - Clears current running Announcements ONLY. Excludes any later scheduled announcements already in the scheduled list. This is a good option for cases when you want to stop announcements from playing at the moment by keep announcements that are scheduled for later in the day. See the Clear Announcements section for more details.
View menu
- Tool bars - Toggle visibility (show/hide) of each Automator tool bar .
-
Sort List - Sort the Scripts list displayed in the Automator list panel.
- By Name - Ascending - A-Z, alphabetic sort on Name. "A" at the top of the list.
- By Name - Descending - Z-A, alphabetic sort on Name. "A" at the bottom of the list.
- By Recent Edits - On Top - Sort on recent edits Date/Time . Most recent edits are at the top of the list.
- By Recent Edits - On Bottom - Sort on recent edits Date/Time . Most recent edits are at the bottom of the list.
-
Progress Bar Mode - The Automator progress bar can display progress in two modes. Select your mode preference by clicking one of these menu items.
- Media Playback Position - The current playback position in the duration of a playing media file.
- Script Step Execution - The Script Step Execution progress. (Example: If a Script has 10 Steps and the current executing Step is the 8th Step, the progress bar will show the Script is 80% complete.)
- Menu Bar - Toggle Show/Hide - When clicked will toggle the window Menu Bar between visible or hidden. (Keyboard shortcut Ctrl+Alt+M)
- Message Strip - Toggle Show/Hide - When clicked will toggle the Message status strip (at bottom of Automator) between visible or hidden.
- Automator User Interface Refresh - Will apply changes to User Interface (visual elements) based on changes made in the Automation Options. (refreshes Now Playing Screen panel options changes)
-
Show Automator Control Panes - These allow you to show/hide various Automator Control Panes. See 'Automator - Control Panes' section for a screen shot labeling each Pane.
- Show Favorite Panes - Shows the Control Panes from the saved Favorite.
- Save Current Panes as Favorite - Saves the current visible Control Panes as a Favorite.
- Pick Panes to Show - Pops up a selection dialog to select the Panes you want to show. Unselected Panes are hidden. See 'Automator - Visual Settings' section for a usage example.
- Show All Panes - Shows all Control Panes.
- Hide All Panes - Closes all Control Panes.
- In Full Screen Hide These - You can auto-hide Automator control bars when jumping to Full Screen mode. Clicking a menu item will toggle between checked and unchecked. Includes Meuu Bars, Toolbars and Message Status Strip. (More info)
- Full Screen Toggle - When clicked, will toggle the Automator between Full Screen or Normal window size. The window title bar (at top of the window) is hidden in Full Screen mode. (More info)
- Clear Album Artwork Cache - Clears the collection of Artwork images that have been cached. Needed if you make changes to folder Artwork files while Sound Mill is running. Removes Windows system locks so you can edit the files.
- Resize Automator to Display Aspect Ratio - Resizes the Automator window to the same aspect ratio as the display device. This will show a good approximation of how the Now Playing Screen will appear when jumping to Full Screen mode. You can also adjust the size by dragging the Automator window edges.
Note on Progress Bar Mode
This works well when you are only running one Script. However, when you have multiple Scripts running concurrently and they are sharing this single progress bar, it may interfere with accurate progress depiction.
Actions menu
- Run Script, Stop, Pause and Resume - Perform these actions for the current selected Script.
- Select Script To Run - Pops up a selection list dialog to choose a Script to run.
- Run Script at Step(x)* - Starts the selected Script to run at a selected Step that you pick via pop-up dialog. Only sequential steps are selectable (ie no timed steps). If the Script is already running, it is restarted at the selected step.
- Play/Replay Step* - Plays the current Step. (replays from the beginning of the audio)
- Previous Step* - Move to and Play the previous Step.
- Next Step* - Move to and Play the next Step.
- Jump to Step* - Plays a selected Step. You are prompted via popup dialog to select a Step.
- First Step* - Move to and Play the first Step.
- Last Step* - Move to and Play the last Step.
- Refresh List - Refreshes the list to pick up recent edits made to the Sound List. This is performed automatically when the user changes focus to the Automator window.
- Stop All - When clicked, all currently playing media is stopped including Scripts, the Scheduler, and items in the Soundlist editor.
- Pause All - When clicked, all currently playing media is paused including Scripts, the Scheduler, and items in the Soundlist editor.
- Resume All - When clicked, all currently paused media is resumed including Scripts, the Scheduler, and items in the Soundlist editor.
- Halt All Scripts - When clicked, all Scripts are immediately ended. No end of script processing is performed. Any executing Steps are terminated immediately. No Fade-Outs are performed.
* Step Advance functions will not execute a Offet Timed Step. Current playing audio Step(s) will be stopped (with NO Fade-Out). If you advance to a Timed Offet Step, that step will be ignored and the next sequential step will execute. If a Script contains Timed Offet Steps, it is best to put them at the beginning of the Script (although not required). This allows optimal operation of Step Advance functions.
Run Script tool bar
Run Script tool bar
Run Script tool bar buttons (Figure 3, from left to right): Run Script, Stop, Pause, Resume, Play Step, Previous Step, Next Step, Jump to Step, Refresh, Stop All .

Behavior menu
- Run Script on Double-Click - When checked, a selected Script will run by pressing the Enter key, Space bar or Double-clicking it with the mouse.
- Allow Concurrent Scripts to Run - When checked, it allows multiple Scripts to be run at the same time. If unchecked, only one Scripts will play at a time. In this mode, when you click Play to start a Scripts, any Scripts currently playing are immediately stopped.
- Cross-Fade Mode - See details below.
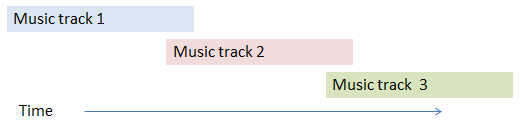
Cross-Fade Mode
Cross-Fade Mode will overlap music track Play Steps for a smooth transition. As the current track ends and fades-out, the next track fades-in (Figure 4).
To enable Cross-Fade Mode, go to Behavior > Cross-Fade Mode. When the menu item is checked, it is enabled . There is also a toggle button on the Tools tool bar. (Figure 5)
The Cross-Fade Time Duration uses the Auto-Fade Duration from the Sound List Editor > Auto-Fade tool bar.
Recommended
- If you plan to use the Announcements feature, it is recommended that you enable the Announcements - Delay Defaults options and set the delay times to match the Cross-Fade Time Duration. That will avoid music tracks from cross fading over any announcements.
Required
FYI: For Cross-Fade Mode to work properly the following settings are set for you automatically when you click Behavior > Cross-Fade Mode.
- All the Auto-Fade modes on the Auto-Fade tool bar must be checked (enabled).
- Allow concurrent sounds must be uncheck (disabled).
- Enables the option for Fade-In on Play, Always Start from 0% Volume.
Tools menu
- View Automator Log - Show the contents of the Automator log file which contains error messages and time stamps for operation performed.
- Reset Automator Log - Resets the log clearing all old messages.
- View Running Scripts - Pops up a window listing all currently running Scripts.
- View Recent Shuffled Script - Pops up a window listing the Step order of the most recent shuffled Script. Scripts are shuffled at run time when the "Shuffle Steps" checkbox is checked. This includes Scripts run by the Scheduler.
- Generate Report - Generates a Sound Plot report or all Sound Items and Scripts .
- Validate All Scripts - Checks all scripts for errors. If any errors are found, it pops up a list of all errors.
- Shortcut Key Summary - Pops up a list of all Automator keyboard shortcuts.
Automator Log
The Automator Log lists start and completion times of Scripts and each Step that is executed with a time stamp. The log will also include error messages. It will automatically reset every time Soundmill is restarted and after 10,000 messages accumulate to avoid excessive memory use. Reset erases all messages currently in the log.
Play Steps are tagged to indicate type of execution: Sequential step (no-tag), Announcement (Ancmt) or Offest Timed(Timed). Step messages also indicate which Script executed the step ([S1], [S2], etc) or if the step was executed by the Scheduler ([Sch]).
Tools tool bar
Tools tool bar
Tools tool bar buttons (Figure 5, from left to right): Generate Report, View Automator Log, Reset Automator Log, Validate All Scripts, View Running Scripts, Cross-Fade Mode .

Scheduler menu
Discussed on the Scheduler Help page.