
 Video Mill : User's Guide
 Contents
 Language
 Product Home
Gradient Image Creator
 Page Bottom
Editor functions
Menu Locator: Media List Editor > Tools .
About
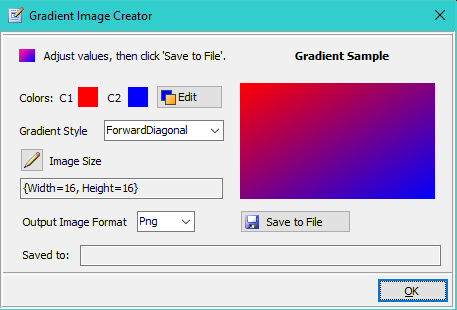
Gradient Image Creator allows you to quickly create two color gradient image files. They are standard format image files so you can use them with other apps as well if needed.
File Lock Limitation
Once you create an image file then Load/Play it on a Media Screen, .Net will lock the file from further changes until Video Mill is closed (which unlocks the file). You will get an error message trying to re-save to the image file when it is locked (ie. 'File In Use' message). In this case, just save to a different filename. For example if GradImage-1.png is locked, save to GradImage-2.png.
Editor Controls
- Edit Colors (C1,C2) - This pops up the Color Group Editor so you can change colors C1 and C2. The editor has a Swap Colors button if you want to reverse the colors in one click. You can also pick from your Favorite Colors if you have saved any. You can create a solid color image by setting C1 and C2 to the same color.
- Gradient Style - You can select from 4 possible orientations for the Gradient.
- Image Size - Sets the Width,Height in pixels of the created image file. Minimum size for reliably good gradient is Width=16, Height=16. See About Image Size section below.
- Output Image Format - Output to any one of formats png, jpg, bmp, or gif. If you don't have a specific format need, we recommend png.
- Save to File - Once Gradient values are adjusted as needed, click the Save to File button. A File Save dialog will pop up. You can save it to any folder location on your storage media.
- Save to - After you save a file, the full path of the file name will appear in this box. You can select the text and Copy it. Then Paste it into a Media Item - Media File entry dialog.
About Image Size
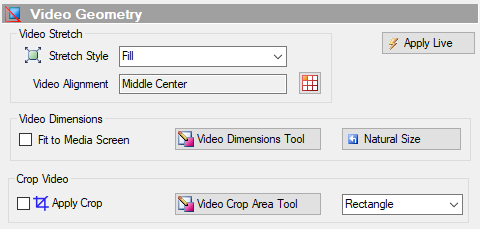
You do NOT need to make the size the same size as the target display, since there is a Stretch Style = Fill setting in the Video Geometry panel (Figure 2) of the Media List Editor. Also check the Fit to Media Screen checkbox (Figure 2) to make a smaller image stretch to fill the entire display. In our testing, even a small gradient image (ex. Width=16, Height=16) makes a surprisingly smooth gradient on a 1080 display when stretching the image. A gradient image matching the display size (ex. Width=1920, Height=1080) made no discernable difference when displayed on a media screen. A smaller image saves disk space.
 To Page Top