
 Sound Mill : Knowledge Base
 Contents
 Language
 Product Home
Remote Controller - Custom Shortcuts for Easy Player
 Page Bottom
Requirement
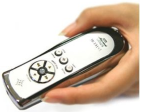
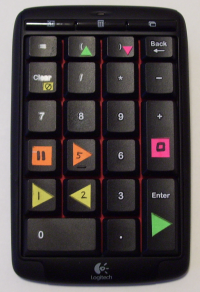
You have a wireless remote controller and need to create custom shortcuts so the controller buttons operate the Easy Player from a distance. This article will apply to any type of remote controller including: Power Point Presenter remotes with lazer pointer (as pictured to the right), wireless numeric key pads (see Figure 1.), and any wireless devices that sends keyboard keystroke signals to the computer.
 To Page Top
Solution Summary
For this article, we will focus on configuring Custom Shortcuts for a wireless numeric keypad, Logitech Wireless Number Pad N305. But the procedure applies generally to any wireless device. We'll explain how the device talks to the computer and how to assign operational functions of the Easy Player to keys (buttons) on the device.
How a Remote Controller Works
Each physical key (button) on the remote controller will send a specific keystroke signal to the computer over the wireless connection. To the computer, it appears as if you had typed a key on the keyboard.
For example, with a Power Point Presenter remote, when you push the Next Slide button the remote might send a Page Down (
PG Dn
) keystroke signal to the computer. These should match the shortcut keys for Power Point -- Slide Show mode.
With a wireless numeric keypad (see Figure 1.), when you push the
4
key the remote might send a Number 4 (
NumPad4
) keystroke signal to the computer. If the keypad has a NumLock key, and numlock is Off, it might send a Left Arrow (
LArrow
) keystroke signal.
Related Help Documents
Procedure
Step 1: Determine Keystroke Signals for Each Device button
Step 2: Decide Which Functions to Assign to Each Key
The following Player Actions can be controlled by a remote control device by Actions Shortcuts:
Play Cue, Stop, Pause, Resume, Volume Up, Volume Down, Mute, Next Cue, Previous Cue, First Cue, Last Cue, Show Mode, Exit Show Mode, Show Cue Buttons.
Also, you can assign any key to immediately play an Adhoc Sound (ex. Applause, Buzzer, or any sound you choose). You can create as many Adhoc Sound keys as you like. (See Help for Ad Hoc Sound Item Shortcuts )
Listing 1 (at bottom) shows a sample mapping of the N305 Number Pad in Figure 1.
You might also want to apply colored stickers to the Number Pad keys as a "recall aid" for all the keys you have setup. School supply and craft stores carry assortments of stickers. In Figure 1, the keys without stickers are available for Adhoc Sound shortcuts (with a couple exceptions listed in the Notes on the Logitech Wireless Number Pad N305 section). Our sample setup leaves 8 keys available for Adhoc Sound shortcuts.
Your device will have a certian number of keys (buttons) available. Depending on the model, Power Point Presenter remotes (see figure on top right) may have anywhere from 4 or up to 8 or more keys. Numeric keypads have upwards of 21 keys. Some devices allow you assign
Ctrl
,
Alt
, and
Shift
to several keys which will allow for key combinations (ex
Ctrl+P
). So a 21 key device that allows key combinations with Ctrl, Alt, and Shift would allow you to control 84 functions (21*4=84) wirelessly!
You should decide how you want each button on the remote to function.
Step 3: Setup Custom Actions Shortcuts
-
This procedure assumes you have already created a Sound List with some Sound Items and you have a Playlist which contains Cue Buttons for some of the Sound Items. We will be setting up keys for the wireless numeric keypad,
Logitech Wireless Number Pad N305 (see Figure 1.). Well discuss how to setup the
Stop
key which we will apply to the "+" key on the Number Pad. All other key setups will be done with the same procedure.
- Open the Easy Player window, then Open the Playlist.
- Go to Tools -- Manage Actions Shortcuts -- Manage Favorite Shortcuts . Follow the User's Guide steps for setting up Favorite Actions Shortcuts.
- Assign the "Stop" action item to the Add ("+") button. Now repeat the above procedure for all other keys that you want to assign Actions to.
- After you have setup all the keys that you need, load a Playlist and test them with your remote control device. Go to Behavior -- Load Current Action Shortcuts From -- A Favorite Shortcuts . This replaces the Current Shortcuts with the saved Favorite Shortcuts and Refreshes the Player.
Notes on the Logitech Wireless Number Pad N305
- This article should not be considered as a recommendation of the Number Pad N305. It worked fine in our testing and are generally positive on the device but it has pros and cons (some listed below). So we encourage you to do your own comparison shopping on features and price. It is just one of many devices you have to chose from. If you need a remote that fits in your pocket for stealth operation, consider one of the many Power Point Presenter remotes or maybe a cell phone app.
- Number Pad N305 has a range of about 33 feet (10 meters) and will work even with obstructions between the remote and the computer. It works through walls in our tests. Room characteristics may affect the range.
- The Enter key sends a "Return" keystroke which the Player will interrpret as a "Play" function. So there is no need to setup a "Play Cue" shortcut.
- The Back key sends a "Back" keystroke which the Player will interrpret as a "Move to Previous Cue" function. So you could use this key as "Previous Cue" button. Back is a Windows Reserved Key and cannot be used for any other action.
- The number keys will each send a "NumPad-x" keystroke. For example, if you press the 4 key, it sends a "NumPad4" signal.
- Some keys on the N305 send multiple keystrokes (presumably to make it work with multiple accounting programs). For example, when you push the Left Parenthesis key [
(
], it sends the following 3 keystrokes:
Alt+Menu
Alt+NumPad4
Alt+NumPad0
In this case, you can pick either Alt+NumPad4 or Alt+NumPad0 to setup a shortcut for this key.
When you have several keys that send multiple keystrokes, be careful how you map them because they may send a common key keystroke.
- The three buttons at the top of the N305 Number Pad can be mapped to Control , Alt , and Shift (with Logitech Setpoint software) which allows you to create keystoke combinations like Alt+NumPad0 . So this is a wireless controller that allows close to 84 functions to be configured if desired.
- There is no NumLock key. So you can't change it's behavior from a Number Pad to a cursor grid-style navigation keys pad with one button click. Grid-style navigation keys are Arrow Keys, Home, End, etc. like on a typical keyboard. Some other Number Pads do have a NumLock key.
- The Equal ("=") key cannot be programmed (on N305) as a shortcut IF you are also using both the Right and Left Parentheses keys [ ( , ) ] as shortcuts. These keys all send multiple keystrokes as shown above and there is overlap.
Listing 1. Custom Shortcut Definitions.Sample setup for the Number Pad N305 shown in Figure 1. Action Key Name Key Symbol ====================================================================== Play Cue, Return Enter Stop, Add + Pause, NumPad4 4 Resume, NumPad5 5 Volume Up, Alt+NumPad0 ( Volume Down, Alt+NumPad1 ) Mute, Delete Clear Next Cue, NumPad1 1 Previous Cue, NumPad2 2 First Cue, NumPad0 0 Last Cue, Decimal . Show Mode, Control+D2 Exit Show Mode, Control+D1 Show Cue Buttons, B