
 Installation and Troubleshooting : Knowledge Base
 Contents
 Language
 Breakthru Software Home
Installing Our Programs
 Page Bottom
Follow Standard Windows Install Procedure
There are no special considerations for installing our programs. This topic is presented for users not familiar with the standard Windows install procedure and user rights considerations.
 To Page Top
Download
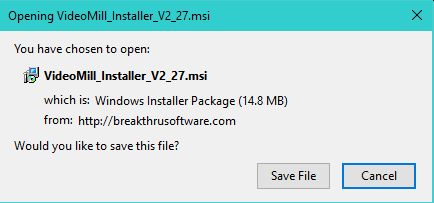
Download the Program Installer MSI file from the product Download Web page. You should get a dialog asking to "Run or Save to File" (depending on your Windows security settings). Either option will work. Run will download then start the installer automatically. If you pick Save, when the download is complete, open your Downloads folder and double click on the installer file to start it.
About Administrator Rights and Program Installation
Windows accounts have one of two types of access rights: Account Type of Administrator OR Standard (Limited on XP). You can determine your Account Type by going to Control Panel -- User Accounts . The default program install target location is in the Windows Program Files folder (typically C:\Program Files). Installing to this folder requires Administrator rights.
How to Install with 'Run As administrator'
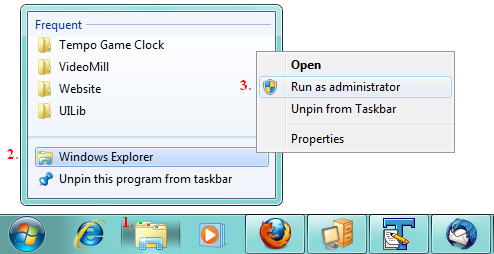
You will need to know the password of an account with Administrator rights to do this. If you are logged on to a Standard Id, when you start the Program Installer, you should get prompted by Windows (7/Vista) to Run as Administrator. This prompt is a Windows User Account Control (UAC) prompt. On XP, it is just Run as but you won't get prompted automatically. If you don't get prompted and the installer fails, you will need to force the installer itself to Run as Administrator. To run a program as an administrator, follow these steps:
- Right-click the Windows Explorer icon either on the Windows taskbar or in the Windows -- All Programs -- Accessories menu. (see Figure 2.)
- Then Right-click the Windows Explorer menu item. (this step not always necessary)
- Then click Run as administrator.
- When you are prompted for an administrator password or for a confirmation, type the administrator password and click Continue.
- Windows Explorer will now open with Administrator rights. Navigate to the Downloads folder and double click the Program Installer.
Program Installer Steps
- License Agreement - Read the Program License Agreement, then click "I Agree".
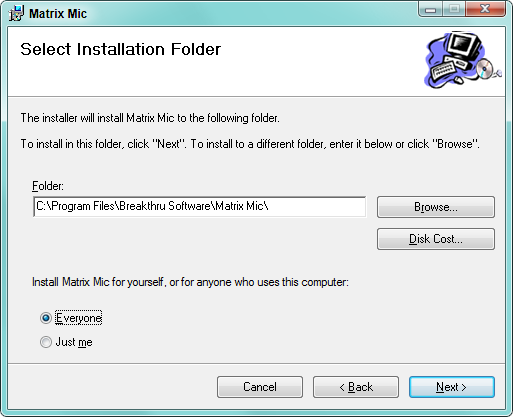
- Select Installation Folder - Click the Browse button if you want to install to a special folder. The default folder is "Program Files\Breakthru Software\ProgramName". You can also select whether to make the program available to all Userids on the computer ( Everyone ) or just for the User that is installing the program ( Just Me ) (see Figure 3.)
- Perform Install - Click Next to confirm the install. When the installer finishes, go to Start -- All Programs -- ProgramName to run the program.
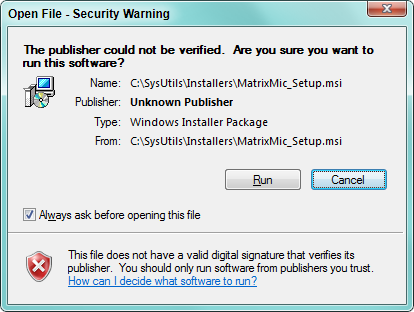
Security Warning Message
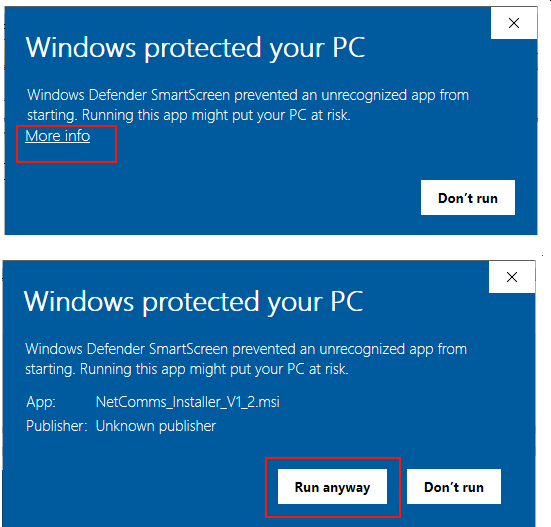
When you run the Program Installer, you may get a warning message similar to "Security Warning - Publisher could not be verified" dialog like the one in Figure 5. This means that Windows did not find a digital certificate signature in the installer file. Our installers are not signed with a digital certificate, so this warning is normal. In Windows 10, it may simply say Unrecognized App. Security minded users can verify the authenticity of the installer file by the Checksum listed on the program's download page. If you downloaded the installer from a web location outside of our website, you may want to verify it.
Security Warning - Windows 10
- Click on the More Info link.
- Next, click on the Run Anyway button.
Keep the Installer Program
It is a best practice (although optional) to move the program Setup file (MS Installer MSI file) to a permanent folder location BEFORE installing the program. And do not delete it after installing. The reason is that Windows remembers the MSI location path in case you need to use the Change -- Repair button in Add or Remove Programs at a later date. The MSI files from a previous release can be deleted once that release is uninstalled.