
 Video Mill : User's Guide
 Contents
 Language
 Product Home
Scheduler
 Page Bottom
Overview
The Scheduler (Scheduler) provides a convenient way to schedule events (playing Media Items or running Scripts) by Date and Time of Day. Just start the scheduler and walk away -- let the Scheduler keep track of the time.
 To Page Top
Scheduler Run Modes
The Scheduler can be run in several modes for user flexibility. When the Scheduler starts, it scans the Current Scheduler Plan. Plan Items are selected by the scheduler to run based on the Scheduler Run Mode criteria below. The mode is set in the Automation Options. If you change the Run Mode while the scheduler is running, the mode will not take effect until the Scheduler is stopped and restarted. The Scheduler can run for up to 24 days without a restart (a limit for .Net timers).
Scheduler Run Modes
- Select by Time Only, Ignore Dates - A Plan Item's time must be later than or equal to the current time. Plan Items schedule dates are completely ignored. Useful if you need to run the same set of videos at the same times on multiple days or nights. You will just need to restart the schedule on the days that you want to run the plan.
- Select by Today's Date/Time Only - A Plan Item's date must be equal to today's date. The Plan Item's time must be later than or equal to the current time. Any items scheduled for future days are not scheduled to run.
- Select by Today and Future Dates - A Plan Item's date must be equal to today's date or a later date. For Plan Items with today's date, its time must be later than or equal to the current time. There is a maximum of 24 days from today's date.
Schedule Plans
You build a Schedule Plan that consists of Schedule Plan Items. You can create any number of plans for different purposes. Only one plan is run at a time. You select the Current Schedule Plan before starting the Scheduler. See Listing 1 for a sample Schedule Plan. If you change a Schedule Plan while the Scheduler is running, the plan changes will not take effect until the Scheduler is stopped and restarted.
Schedule Plan Item Types
- Play a Media Item. (See "Important Media Item Settings" below.)
- Run an automation Script .
Basic Steps
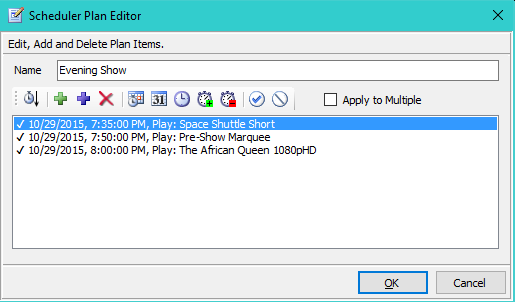
- Create a Scheduler Plan - Use the Scheduler Plan Editor (Figure 2) to add Media Items or Scripts to a plan and set the play/run times.
- Set a Scheduler Plan as the Current Plan - Designate the Current Plan to be used by the Scheduler.
- Start the Scheduler - All Plan Items in the Current Plan will be selected based on the Scheduler Run Mode and scheduled to execute at the specified date and time.
Important Media Item Settings
- UnLoad When Media Ends - When operating in Multi-Screen mode, if you want the Media Screen to close after it is done playing, then the Media Item's UnLoad When Media Ends attribute must be checked in its Play Modifiers. In Single-Screen mode, it is better to leave it unchecked.
- Marquees as Digital Signage - You may want to include a full screen Marquee as Digital Signage as part of a Scheduler Plan. If so, see the Scheduler Considerations for Marquees as Digital Signage.
Sample Scheduler Plan
The sample Scheduler Plan in Listing 1 is for running a feature movie. The feature is preceded by a 15 minute short video. Next a full screen informational Marquee with a 10 minute Count-down timer is displayed. Setting the Post Delay on the Marquee Media Item, tells Video Mill to display it for the duration of the delay. Each screen takes up to a few seconds to Load which is not included in the schedule End Time calculation, therefore screens are not programmed to start the exact second the previous one ends. Exact Load time is dependent on the video length and other factors such as your processor speed, etc.
Listing 1. Sample Scheduler PlanScheduler Report ___________________________________ Date/Time stamp: 10/30/2015 9:55:33 AM Last started: 10/29/2015 1:57:30 PM Status: Stopped ___________________________________ Scheduler Plan Name: Evening Show Items in Plan # Enabled, Date, Start Time, End Time, Media Type, Item Name (Length) 1) ✔ 10/29/2015, 7:35:00 PM, 7:46:40 PM, Play: Space Shuttle Short (11:40) 2) ✔ 10/29/2015, 7:50:00 PM, 7:59:45 PM, Play: Pre-Show Marquee (:00), PostDelay-09:45 3) ✔ 10/29/2015, 8:00:00 PM, 9:45:20 PM, Play: The African Queen 1080pHD (01:45:45) Summary: 3 - Items scheduled. 0 - Warnings. 0 - Errors. Legend: ✔ Enabled. ☒ Disabled. ULoE - Unload Screen when Media Ends.
Scheduler menu items
These menu items are found at Tools > Automation > Scheduler . Several functions have associated keyboard shortcuts. Some of these functions are also accessible from the Scheduler tool bar.
- Start/Pause/Resume - Starts, Pauses, or Resumes the Scheduler. When started, the Scheduler Plan built of all Media Items that are in the Scheduler Plan. If clicked while the Scheduler is running, it will be Paused. If clicked while the Scheduler is Paused, it will Resume running. When the Scheduler is Paused, NO Media Items will be loaded to Media Screens and played. So if a scheduled item's time pops while the Scheduler is paused, its event is lost.
- Stop - Stops the Scheduler.
- Restart - Performs Scheduler Stop (if currently running), then Start in one click. This will rebuild the Scheduler Plan to pick up recent edits or rebuild the daily plan.
- Status - Shows the current status of the Scheduler as a message on the status bar.
- Scheduler Plan Report - Pops up a viewer with a Report (see Listing 1) of what is in the Current Scheduler Plan. It includes any detected errors or warnings regarding the plan. It is a good idea to check the report before starting the Scheduler to make sure all the Loads you expected are in the plan.
- Manage (Edit/Add/Delete) Scheduler Plans - Pops up the Scheduler Plan List Selector that allows you to Edit, Add, Delete and Duplicate Scheduler Plans. Click the Edit button to edit a selected Schedule Plan with the Scheduler Plan Editor. (see Figure 2)
- Select Current Scheduler Plan - The Current Scheduler Plan is the one used by the Scheduler when it starts. You can edit the Current Scheduler Plan while the Scheduler is running, but you need to Stop and Restart the Scheduler to pick up any changes.
* Start/Pause/Resume/Stop/Restart have a
 Reserved PowerKey. (More Info)
Scheduler Log
Scheduler Log has time stamped messages from the Scheduler runtime events. It shows what items are scheduled and which items did not get scheduled with a reason message. (Accessible from the Scheduler tool bar.)
- View Log - Displays the log in a popup window.
- Reset Log - Clears the log of all previous messages.
Scheduler tool bar
The Scheduler tool bar (Figure 1) provides access to the management and operating functions for the Scheduler. See menu items above for details on each function.
Scheduler tool bar
Buttons (Figure 1, from left to right): Start (also Pauses and Resumes), Stop, Scheduler Status, Scheduler Log, Reset Log, Current Schedule Plan Report, Manage Scheduler Plans, Select Current Schedule Plan .

Scheduler Plan Editor
Allows you to edit a Plan including adding, deleting and setting the schedule time of Schedule Items in the plan. A single Media Item may be scheduled at multiple times in the same plan.
Edit Plan Items Toolbar
- Sort by Schedule Time - Sorts the list from earliest to latest scheduled (by Date and Time).
-
Add Media Items -
 You are prompted to select a set of Media Items (one or more). A new Schedule Item is added to the Plan for each selected Media Item(s).
 -
Add Scripts -
 You are prompted to select a set of automation Scripts (one or more). A new Schedule Item is added to the Plan for each selected Script(s).
 - Delete* - Deletes the selected Schedule Item from the Plan.
- Set Date and Time* - Sets the Date and Time that the selected Schedule Item will be executed. Pops up a Date/Time Editor (Figure 3).
- Set Date Only* - Sets the Date that the selected Schedule Item will be executed. Preserves the Item's Time value. Pops up a Date/Time Editor (similar to Figure 3).
- Set Time Only* - Sets the Time that the selected Schedule Item will be executed. Preserves the Item's Date value. Pops up a Date/Time Editor (similar to Figure 3).
- Add Time to Schedule Time* - Add an amount of time to the the selected Schedule Item's schedule time. You are prompted to specify hours, minutes and seconds to add. For example, if you want to shift a Schedule Item from a 7PM show time to a 10PM show time, you would specify an Add of 3 hours.
- Subtract Time from Schedule Time* - Subtracts an amount of time from the the selected item's schedule time. Essentially the same operation as the Add Time except that the time is subtracted.
- Enable Schedule* - Enables the selected item's schedule. A schedule must be enabled for the Scheduler to consider it for execution.
- Disable Schedule* - Disables the selected item's schedule. Disabling provides a way to prevent a single item from execution without totally deleting it from the plan. So it can be reenabled at a later time or date.
- Apply to Multiple - When checked, the action buttons above will apply to a selection of multiple Schedule Items rather than just the selected Schedule Item. You are prompted to pick the set of Schedule Items that the action will apply to.
* - Actions with the asterisk (*) also work according to the Apply to Multiple functionality when that checkbox is checked.
Date/Time Editor
The Date/Time Editor (Figure 3) is popped up when you click any of the Date or Time Set buttons in the Scheduler Plan Editor above. The composite Date/Time text at the bottom of the editor also shows the Day Of The Week for the selected date.
Keyboard functions
Select any of the date or time fields with the mouse or Tab key. Then the keyboard Up and Down arrow keys will advance the selected value.
Date Quick Sets
- Calendar - The Calendar button at the end of the date control will popup a Monthly Calendar dialog for date selection.
- Date to Today - Sets the date field to today's date.
- Reset Date - Resets the date the original date when the editor was opened.
Time Quick Sets
- Time to Now - Sets the Time field to the current local time.
- Cycle 12s - With each click, this button cycles the Time field setting between: 12AM (Midnight) and 12PM (Noon). (a quick set productivity button to clear the minutes and seconds fields)
- Reset Time - This resets the Time field to the original time value when the editor was opened -- effectively un-doing any time edits made.
Copy and Paste
Copy and Paste buttons allow you to copy the date and time from one schedule, then open another schedule and paste the value to the new schedule.
