Video Mill : User's Guide
 Contents
 Language
 Product Home
Screens(1) Options
 Page Bottom
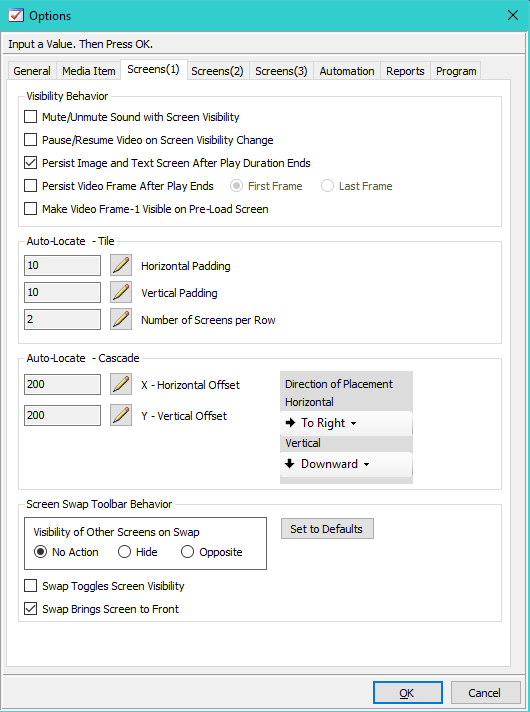
The options on this page are set in the Screens(1) Options dialog (Figure 5.).
Visibility Behavior
- Mute/Unmute Sound with Screen Visibility - When a Screen's visibility changes, sound will be muted or unmuted. (Muted when the screen becomes hidden and unmuted when the screen becomes visible. The video continues to make forward play progress even though it is invisible and muted.
- Pause/Resume Video on Screen Visibility Change - When a Screen's visibility changes, the screen's video will be paused or resumed. (Paused when the screen becomes hidden and resumed when the screen becomes visible. If the screen has not begun play when it becomes visible, play will begin. It also effectively mutes/unmutes the videos sound. This option allows you to black out a screen and make it pause with one click. Then you can resume the video and make it visible again with one click. See the Visibility tech notes for more details.
- Persist Image and Text Screen After Play Duration Ends - When checked, when an Image or Text Screen play duration reaches its end, the image will continue to persist (not be hidden). When unchecked, the image will be hidden (effectively making the Media Screen go blank.) If you are displaying digital signage to an audience and you don't want it to go blank until you manually unload/close the Media Screen, then check this option.
-
Persist Video Frame After Play Ends - When unchecked, the Media Screen will go dark at end of play. If checked, when video playback ends or it is stopped by clicking the Stop button, the video frame will persist (stay visible) on the Media Screen. Designate either First Frame or Last Frame of the video.
- Fade-In Consideration: This option has no effect when using Auto-Fade-Out or Cross-Fade modes.
- Not recommended for use when playing video playlists with the Automator because you may get a jarring frame-1 flash before the next video begins playing. -
Make Video Frame-1 Visible On Pre-Load Screen - When checked, if you click the Load button to pre-load a video, its first video frame (frame-1) will be visible in the Media Screen. When unchecked, the video will be invisible until you click the Play button (the Media Screen Background will also be invisible).
Fade-In Consideration: This option has no effect when using Auto-Fade-In or Cross-Fade modes. When using Fade-In modes, the first frame is always invisible (Opacity=0). It's the way Fade-In works.
 To Page Top
Auto-Locate - Tile
These options affect the placement results of Screens Auto-Locate functions. See the Screens Menu section for examples of Tiling and Cascading.
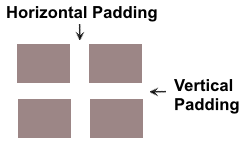
- Horizontal Padding - Set the amount of space (in pixels, right-side padding) between Screens when tiled. Zero(0) implies no padding.
- Vertical Padding - Set the amount of space (in pixels, bottom-side padding) between Screens when tiled. Zero(0) implies no padding.
- Number of Screens per Row - Set the number of screens across each row when tiled. (effectively the same as number of columns if you think in terms of a table arrangement of rows and columns)
Horizontal and Vertical Padding values are also used when creating Basic Load Templates .
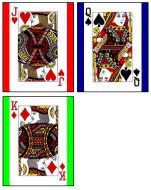
Figure 1. shows Tiled Screens across a Horizontal row, two screens per row. Note the small Padding between screens.
Auto-Locate - Cascade
- X - Horizontal Offset - Set the X Offset that each subsequent Screen is positioned when cascaded. (in pixels)
- Y - Vertical Offset - Set the Y Offset that each subsequent Screen is positioned when cascaded. (in pixels)
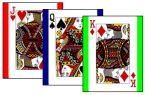
Figure 3. shows Cascaded Screens with a small Vertical Offset and a Horizontal Offset set to about 75% of the width of a screen.
Direction of Placement
Tile and Cascade methods use these direction settings (see Figure 5) to determing which direction to place each subsequent screen. You select one Horizontal direction and one Vertical direction. These two settings are used in combination. In most cases, you will want these set to To Right and Downwards which creates the cascade effect shown in Figure 3. The other direction values are provided in case you have unique placement requirements.
Horizontal
- To Right - Each subsequent screen is placed to the right of the previous screen based on the X Offset value.
- To Left - Each subsequent screen is placed to the left of the previous screen based on the X Offset value.
Vertical
- Downwards - Each subsequent screen is placed vertically downward in relation to the previous screen based on the Y Offset value.
- Upwards - Each subsequent screen is placed vertically upward in relation to the previous screen based on the Y Offset value.
Direction Example
Figure 3 shows screens cascaded with direction set to To Right and Downwards . The Jack of Hearts is the first screen in the order with its upper left corner placed at the Reference Dimensions Location . Each subsequent screen is placed down and to the right using the X and Y Offsets specified (see Figure 5).
Screen Swap Behavior
These options control the behavior of the Screen Swap tool bar buttons (Figure 4). The Defaults button resets these behavior options to the default behavior.
Visibility of Other Screens on Swap
-
When you click a button to Screen Swap, the visibility of other loaded screens will be affected as follows.
- No Action - No visibility change to other screens.
- Hide - All other screens will be hidden.
- Opposite - All other screen's visibility will be set to the opposite of the target screen. So when the target screen becomes visible, all other screens will become hidden. When the target screen becomes hidden, all other screens will become visible.
Other Screen Swap Options
- Swap Toggles Screen Visibility - When a Screen Swap button is clicked, the target Screen's visibility will toggle (between hidden and unhidden).
- Swap Brings Screen to Front - When a Screen Swap button is clicked, the target Screen is brought to the front of other Media Screens. Useful when you have multiple overlapping Media Screens and you don't want to change their visibility.