
 Video Mill : User's Guide
 Contents
 Language
 Product Home
Marquee Quick Start and Toolbars
 Page Bottom
Quick Start Instructions
If you are new to Marquees, this set of Quick Start instructions will guide you to create your first Marquee and first Marquee Style.
1. Create a Marquee
First we create a Marquee and test it.
Steps
- Go to Tools > Marquee > Manage Marquees. In the resulting Marquee List dialog, click the Add to create a new Marquee.
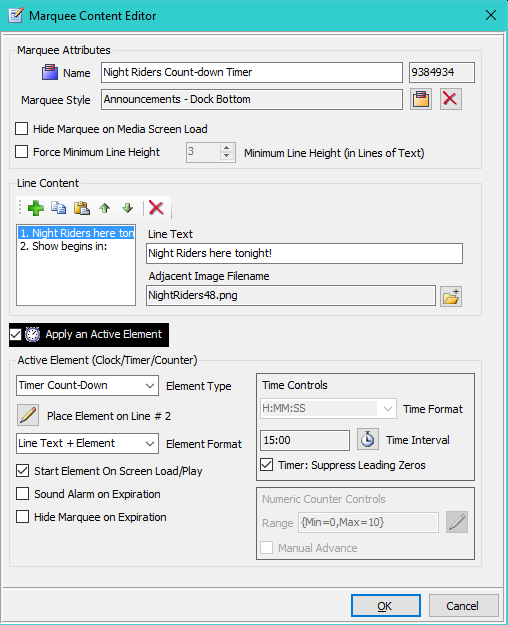
- Now with the new Marquee selected, click Edit. The Marquee Editor (Figure 1) will open.
- In the Line Content group box, one line was automatically added. Enter some Line Text. You can add more lines if you like by clicking the Add Line button (green plus sign "+" button).
- Now click OK to close the dialog.
- Click OK again to close the Marquee List dialog.
- Now select any Media Item in your Media List.
- Using the Marquee Edit Tools toolbar (Figure 3), click the Set a Marquee button. From the resulting list, pick the new Marquee.
- Now play the Media Item. The newly created Marquee should appear rendered with the Default Marquee Style.
2. Create a Marquee Style
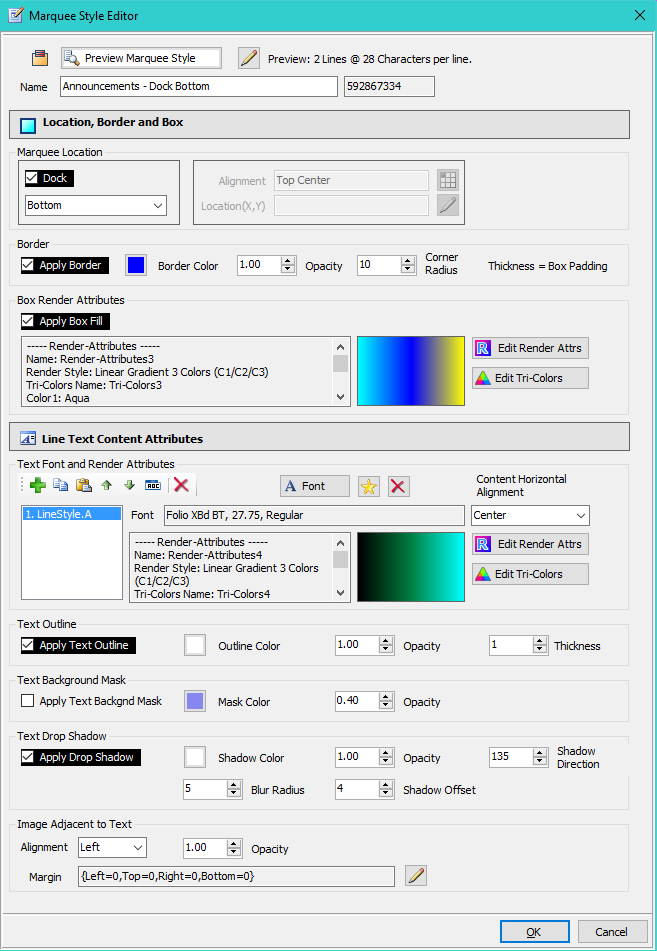
Next we'll create a simple Marquee Style to select colors, fonts, etc. We'll set the Border, Box and Text Font and color. Then apply the Style to the Marquee created above. At first glance the Marquee Style Editor (Figure 2) may look a bit intimidating, but you only need to focus on the features you want to Apply by checking the feature's Apply checkbox.
Steps
- Go to Tools > Marquee Style > Manage Styles. In the resulting Styles List dialog, click the Add to create a new Marquee Style.
- Now with the new Marquee Style selected, click Edit. The Marquee Style Editor (Figure 2) will open.
- As you proceed with these steps, you can use the Preview Marquee Style button at the top of the editor to see the effect of the changes as you make them.
- Set the Marquee Location. Check the Dock checkbox and select 'Bottom' for the dock location. If you want to use Media Screen Alignment instead of Dock, then uncheck the Dock checkbox.
- Click Apply Border. Change the Border as desired.
- Click Apply Box Fill. Click the Box Render Attributes button. Pick a Render Style and change the colors as desired.
- in the Text Font and Render Attributes group box, first pick a Font and a Font Size. Then if you want to change the font Render Style, click the Text Render Attributes button. If the Marquee has multiple lines, each line can have its own Line Style. When you only create one Line Style, all Marquee lines will get that style.
- Now click OK to close the dialog.
- Click OK again to close the Marquee Styles List dialog.
- Now select the Media Item that uses the Marquee created above.
- Using the Marquee Edit Tools toolbar (Figure 3), click the Edit Marquee button. The Marquee Editor (Figure 1) will open.
- Click on the select Marquee Style button. From the picklist, select the style you just created. Now the new Style has been assigned to the Marquee.
- Finally, play the Media Item. Its Marquee should appear rendered with the new Marquee Style just created.
 To Page Top
Marquee Edit Toolbar
Marquee tool bar (Marquee tool bar) (Figure 3.) provides editing actions for the Marquee of the selected Media Item. These functions are also available from edit buttons on the Media Screen Dimensions panel.
- Set a Standard Marquee - Sets the selected Media Item's Marquee to a standard Marquee (via pick list popup).
- Set a Timed Messages - Sets the selected Media Item's Marquee to Timed Messages (via pick list popup).
- View Marquee - View the details of the selected Media Item's Marquee .
- Edit Marquee - Edit the selected Media Item's Marquee.
- Edit Marquee Style - Edits the Marquee Style used by the Marquee of the selected Media Item.
- Remove Marquee - Removes the Marquee from selected Media Item. The Marquee remains available for later use.
- Marquee Edit Tools toolbar - Buttons (Figure 3, from left to right): Set to Standard Marquee, Set to Timed Messages, View Marquee, Edit Marquee, Edit Marquee Style, Remove Marquee.

Marquee Runtime Toolbar
 Action Apply Mode
-
These actions allow you to operate the Marquee in a Loaded Media Screen. They do NOT make permanent changes to Marquees.
If a Media Screen is not Loaded, these actions are ignored.
- Refresh Marquee - Use the Refresh button to update the on-screen Marquee after an edit operation including Marquee Style changes. This will reset the Timer if one is running.
- Toggle Marquee Visibility - The Marquee is toggled between Show and Hide states. Timer continues to run while hidden.
- Start Marquee Timer/Counter - Start / Pause/ Resume the timer with this button.
- Reset Marquee Timer/Counter - Stops and Resets the timer to the Timer Interval amount specified.
- Set Marquee Timer to New Time - Changes the timer time interval value.
- Set Marquee Counter to New Number - Changes the value of the Numeric counter. You are prompted via dialog to enter a new value..
- Refresh Line Text Only - Refreshes the text lines of the Marquee only. Timer is not reset.
- Marquee Runtime Tools toolbar - Buttons (Figure 4, from left to right): Refresh Marquee, Toggle Visibility, Start Timer/Counter, Reset Timer/Counter, Set Marquee Timer to New Time, Set Marquee Counter Value, Refresh Line Text Only.

Note: When controlling Timed Messages in Manual Operation mode , the Marquee Runtime Tools toolbar buttons perform different functions.