Video Mill : User's Guide
 Contents
 Language
 Product Home
Marquee Overview
 Page Bottom
What is a Marquee?
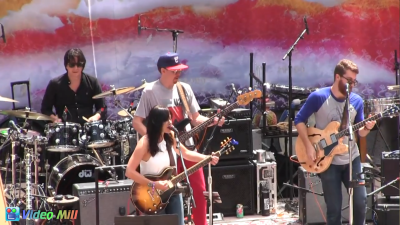
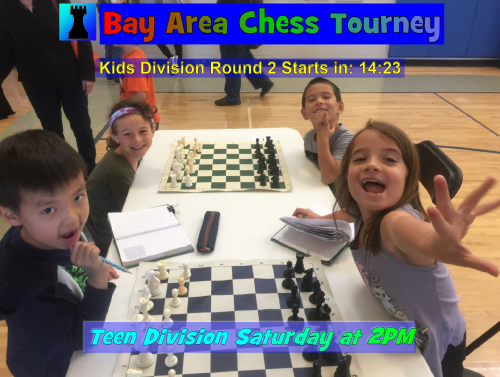
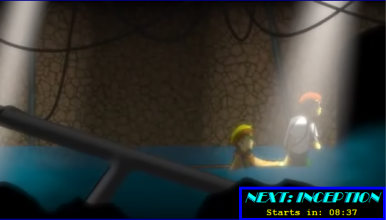
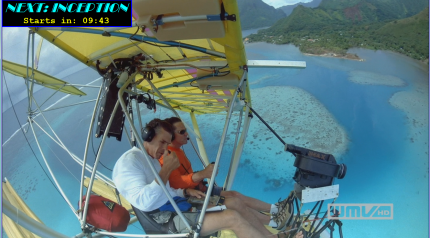
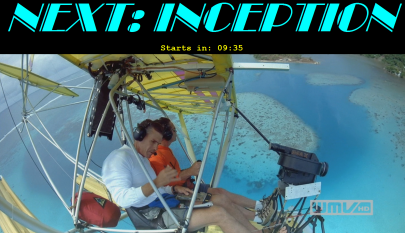
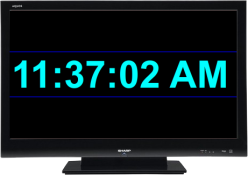
With Video Mill Marquees you can inform your audience of upcoming events with dates and times. Or using the Wall Clock or Count Down Timer function, you can indicate which video will be playing next and how soon (see Figure 1). They can be added to any Media Screen, a screen playing a video or a screen displaying a static image (jpg, png, bmp, etc). The Marquee text lines can be changed in seconds to display new message. Then just click the Refresh button. You can show or hide a Marquee with one button click at any time.
With Timed Messages , you can display multiple messages in sequence at a custom time interval.
Advantages of a Marquee Over a Static Image
You could, of course, just use static image files (png, jpg, etc) as Digital Signage by creating a Media Item with the image file as the Media Filename. But there are advantages to using a Marquee:
- You can use an active element (Count-down timer or wall clock) provided by the Marquee.
- You can change the lines text at any time and refresh it to change event announcements throughout the day. A Count-down Timer will continue to run even as you swap in new event messages.
Figure 1 shows a simple Marquee with two lines of text. Line one announces the Next feature. Line 2 has a count down timer indicating time remaining until the next feature begins.
 To Page Top
Key Features
Visual Presentation
- - The Marquee Style Editor page shows sample images of some of these features.
- Border - Surround the Marquee with colored border (square or rounded corners).
- Use Any Font - Every font installed on your computer is available at any font size including custom sizes.
- Text Decoration - Text outline, background mask, and drop shadow.
- Unlimited Colors
- Translucent Backgrounds - Marquee background can be solid, semi-Translucent or no background at all exposing the video behind it. (using Opacity setting)
- Color Gradients - Blend across 2 or 3 colors -- for text and Marquee background.
- Background Image - Use a Background Image if you prefer.
- Any Number of Text Lines - Each line can have its own fonts and colors.
Active Elements
- Time of Day Clock (Figure 3)
- Timers - Count-Up or Count-Down timers. (Figure 1)
- Numeric Counters - Count-Up or Count-Down numbers.
Location on Media Screen
- Dock - Stretch across any side of the display.
- Alignment - Position in any corner, middle of any side, or in the center of the display.
- Precise Point Position - At any exact pixel location (X,Y) on the display.
Modularity and Reuse
- Available Across Media Lists - Marquees and Marquee Styles that you create are available to any Media List.
- Apply Any Marquee to Multiple Media Item - Create once, reuse on many.
- Marquee Styles Available to Any Marquee - Visual Styles (fonts, colors, etc) are maintained separately so you can quickly swap the visual appearance of any Marquee in a couple clicks.
Special Purpose
- Subtitles - Industry standard movie Subtitles (SRT files) can use any Marquee Visual Style.
- Timed Messages - Rotate a series of messages on the screen on a predefined time cycle.
Operation
- Toggle Visibility - Show or hide a Marquee at any time in one click.
- Change Text - You can quickly change the Marquee text, then refresh the Marquee.
- Start/Pause/Resume timer - Count-Up/Down timers can be paused/resumed or reset at any time in one click.
Simple Marquees
Marquees can be used to pop-up a small message box in any corner of the screen (see Figure 1.) while a video continues to play. The Marquee in Figure 3, is very simple example. It has 2 lines of text. Line 2 is used for a Time of Day Clock. Once created can apply it any Media Item in a ouple mouse clicks. Then on show night, all you need to do is set the text of line 1 which shows the event name and make it visible in a corner of the screen. The Marquee sizes itself automatically based on the font sizes used and the text. So changing the text and refreshing the Marquee can be done in seconds -- No tedious resizing is needed.

Custom Marquees for Digital Signage (Full Screen)
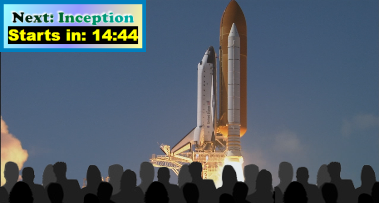
You may want to use Marquees for digital signage to announce event times, locations and other important information to event attendees. In this case, you can create a Marquee to fill the entire screen (ex. Figure 4.).
This example takes advantage of many of the Marquee formatting features. It uses three Text Lines. All the Text Lines use Margin and Padding attributes for spacing. They also have their own colors and fonts applied.
Marquee Features used in Figure 4 Sample
- No Border or Box - By not applying a Border or Box, the text lines float and allow the video behind to be fully visible.
- Fonts and Colors - Each line of text uses its own font/font-size and colors.
- Line Spacing - Using the Margin setting (in Text Line Render Attributes), you can apply custom line placement. Set the Margin.Top value to the number of pixels you want the line to move down the screen.
- Logo Image - Line1 uses an Adjacent Image to place the tournament logo next to the text.
- Text Background Mask - Each line uses a Text Background Mask to make the line standout. Lines 2 & 3 have Mask Opacity set so that the video behind is partially visible.
Scheduler Considerations for Marquees as Digital Signage
You may want to include a full screen Marquee as Digital Signage (see Figure 4 example) as part of a Scheduler Plan. For example, before a movie feature loads and plays, you may want a show a Marquee screen to announce information and have a count down timer for the show start. The catch is that if the Media Item's Media File is a static image (png, jpg, bmp, etc), it has no play time length like a video or audio file. And in general you want to set the Media Item UnLoad When Media Ends so the screen will close before the next one in the schedule loads. The solution is to set a Post Delay time on the Media Item for whatever amount of time you want the screen to stay showing. If you want the Marquee screen showing for 10 minutes, set the Post Delay to 10 minutes.
Locating a Marquee on the Media Screen
Let's assume you want to screen a short video before the main attraction. You could size the Marquee (by setting small font sizes) to fit in the corner of the screen while the short video is playing. The size would be large enough to read from the back row but small enough that it doesn't take up too much screen real estate so the short video can be viewed. And you can hide the Marquee with one mouse click for a while even as the timer continues to count down, showing the Marquee at regular intervals.
To locate the Marquee in the lower corner (Figure 5), In the Marquee Style Editor, set the Marquee Location to Alignment > Bottom,Right. Unchecking the Dock checkbox, allows alignment.
Docking a Marquee to a Side of the Media Screen
You can also dock the Marquee to any of the four sides of the Media Screen (top, bottom, left, right) -- useful when you have a long text string to display. In the Marquee Style Editor, set the Marquee Location to Dock > Bottom.

Marquee Fonts Sizes on HD-1080 Displays
Here are some sample screen shots (resized smaller obviously to fit this page) to show the relative perspective of font sizes to an HD 1080p video full resolution screen.
Figure 7. shows a Marquee displayed over a HD 1080p video with screen sized to natural video size (full 1080p resolution) with the top line font is set to font-size 36. Figure 8 shows a sample of font-size 120. You just have to consider how large a font is needed to be readable from the back row of the room.
You can set Custom Font Sizes
simply by typing a desired size into the Font dialog Size textbox.
Marquee as Full Screen Clock or Timer
You can use a Marquee as a Full Screen Clock (Figure 9) or Timer (Figure 10). The steps below will create the clock in Figure 9 using the Marquee Editor. You can customize the look as desired (font size, colors, screen alignment, etc).
Edit Steps
- Create a Media Item with a black background -- go to Edit Media Item > New Media Item > New Background Screen. Or create a Media Item from an image file or video file. This will effectively serve as a background for the clock. You could also use an themed image as in Figure 11.
- Create a Marquee with one Line. Assign Active Element Type as a Clock or Timer) to the line. Add the Marquee to the Media Item using the Marquee Edit toolbar.
- Create a new Marquee Style and set the Line1 Font Size large enough for the clock digits to fill the width of the display. Allow space for a double digit hour (ie 10:00 AM takes more horizontal space than 9:00 AM). For AM/PM clock time digits (11 characters including colons and spaces), a font size = 200 (approximately) will fill a 1080p display. Clock time will display in your local country time format (AM/PM vs 24 hour time). Font size will vary to some degree based on the font family you select.
- Set the Marquee Alignment to Middle Center (in the Marquee Location settings).
- Set the Line Text color as desired in the Render Attributes. (cyan text color used in Figure 9)
- Add the new Marquee Style to the Marquee using the Marquee Edit toolbar.
- You can optionally apply a Border and/or Box. Neither is applied in Figure 9.
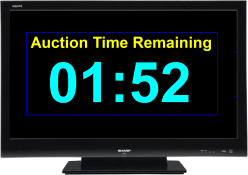
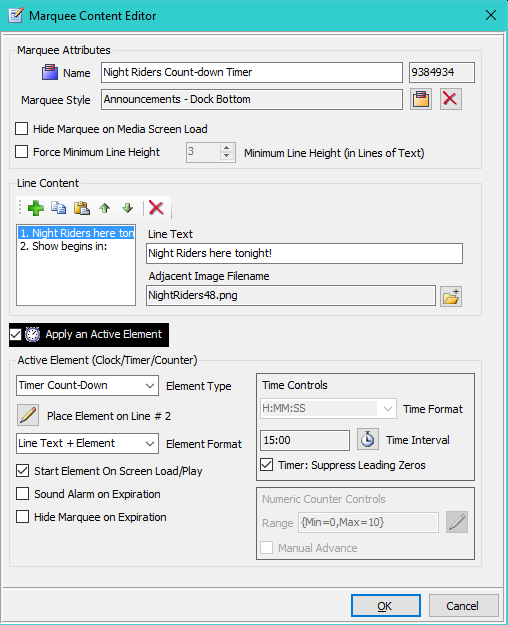
Marquee as Timer (Figure 10) is created with 2 text lines with a count-down timer placed on line 2. Note that the font size used for the Timer can be larger than the clock font size since there are fewer horizontal characters to display.
Marquee as Numeric Counter
Counter Operation
- Counter Range - Set low and high values to count through.
- Count Direction - Count up or down through the range.
- Manual Operation - Use a toolbar button to bump count.
- Timed Operation - You can set a time interval. The count is bumped automatically every time the interval elapses.
The steps below will create the counter in Figure 11 using the Marquee Editor. You can customize the look as desired (font size, colors, screen alignment, etc).
Edit Steps
- Create a Media Item with a black background -- go to Edit Media Item > New Media Item > New Background Screen. Or create a Media Item from an image file or video file. This will effectively serve as a background for the clock. Figure 11 example uses a themed image for the Media Item.
- Create a Marquee with two Lines. Assign Active Element Type as a Numeric Count-Down) to Line2. Add the Marquee to the Media Item using the Marquee Edit toolbar.
- Create a new Marquee Style and set the Line Font Size large enough for the counter to fill the width of the display. Font size = 200 (approximately) will fill a 1080p display. Font size will vary to some degree based on the font family you select.
- Set the Marquee Alignment to Middle Center (in the Marquee Location settings).
- Set the Line Text color as desired in the Render Attributes. (cyan text color used in Figure 9)
- Add the new Marquee Style to the Marquee using the Marquee Edit toolbar.
- Check Sound Alarm on Expiration checkbox if you want the alarm to sound when the counter reaches zero.

Logo Marquees
A common use for a Marquee could be to put a small branding logo image in a corner of the screen (Figure 13, lower left corner of screen). Branding could be product, company, event, store name, etc. You create the logo image with any photo editor and save it in any common image format (png, jpg, gif, etc). It can be any size you choose. Adjacent text is optional. The image can be placed to the left or right of the text (Figure 14 and Figure 15). Image L/R placement is set in the Marquee Style Editor, Image Adjacent to Text > Alignment setting. The text and the logo image filename are set in the Marquee Editor, Line Content settings.