
 Video Mill : User's Guide
 Contents
 Language
 Product Home
Chroma Key Filter (Green Screen / Blue Screen)
 Page Bottom
Overview
Chroma keying, is a special effects technique for compositing (layering) two images or video streams together based on color hues (chroma range). The technique is used to remove a background from the subject of a photo or video.
Available Chroma Key Colors: Green, Blue, or Red. Green Screen is explained here, but Blue Screen and Red Screen are also available Color Key selections (Figure 6) and work in the same manner. See the Tips section below for things to be aware of when selecting you canvas color.
In Brief
- First you record your own video with your standard camera setup, but use a green canvas backdrop behind the video subject(s).
- Once your video is recorded, you will use Video Mill Video Effects feature to combine it with a background video using the 'How to' steps below.
- Video Mill removes the key color (green) to expose a background video (or static image) behind the foreground video.

 To Page Top
Recording the Green Screen
Once you have the video configured so that it plays with the background, you can record it to an MP4 file for use on another computer that does not have Video Mill installed or upload it to social media (ex YouTube). See this page for Recording instructions.
Behavior Settings
For Green Screen effect to work, the following Behavior Settings are Required (in the Behavior menu).
- Load Template Source - Not Active.
- Use Video Effects - Enabled (checked).
- Use Video Filters - Active (checked).
How to Use the Green Screen Filter
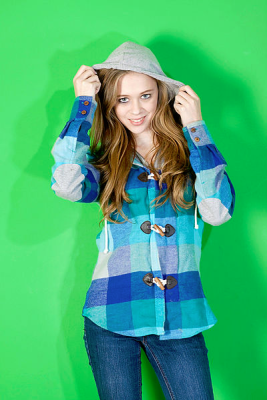
These Instructions assume you have a basic understanding of how Video Mill works and how to create a basic Media Item with a Filter. Image samples are screen shots above are from actual Media Screens. Your results will vary based on the quality of your green screen backdrop (see Green Screen Tips section below). You can test this procedure using the Green Screen Girl image (Figure 1). Right click on the image and pick Save Image As from the context menu. Then you can drop the file into Video Mill and try out green screening.
This procedure is a one-time set-up task for a Media Item. The next time you want to play the green screen video, you will simply click Play.
Begin here
- Record your video in front of a Green Screen backdrop. Or you may stream your video from a camera.
- Drag/drop the Green Screen video file into Video Mill to create a Media Item.
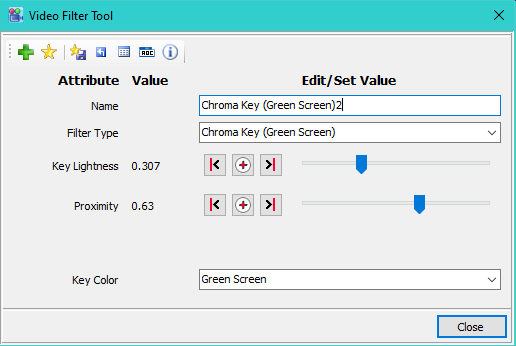
- In the Video Filters control section (Figure 4), check the Apply Filter check box. Click the Apply Live button so filter settings will be applied to the live Media Screen. Then click the Filter Edit Tool button to open the editor (Figure 6).

- In the Screen Layout Attributes panel (Figure 5), set the Media Item Background Style to 'Solid Color (C1)', White. While you are adjusting the filter to remove the green key color, a white background will help show stranded green pixels.
- Click Play to load the Media Item to a Media Screen so you can see the effects of changing the filter settings. You can Pause the video while adjusting these settings to make it easier to fine tune the filter settings.
- Select Green Screen from the Key Color pulldown menu. (Figure 6)
- Move both slider controls to the high end (value=1.0, right end)(Figure 6).
- Now slide the Key Lightness slider (Figure 6), backward until all of the Green background disappears (becomes invisible). (Figure 2)
- Fine tune the color masking with the Proximity slider (Figure 6). This will clean up the green pixels along the edges of the subject. And any pixels on the subject that are very close to green may have been erased by the Key Lightness adjustment.
- You should now have a fully masked image as shown in Figure 2. The Video Filter Edit Tool screen shot (Figure 6), shows the settings used to mask the sample image used for this tutorial.
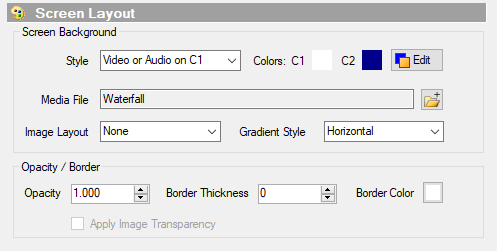
- Now add the background video or image. Go to the Screen Layout Attributes (Figure 5). From the Style pulldown, pick Video or Audio on C1 (when using a background video or static background image). Then click the Media File Browse button to select the background source file on your harddrive.
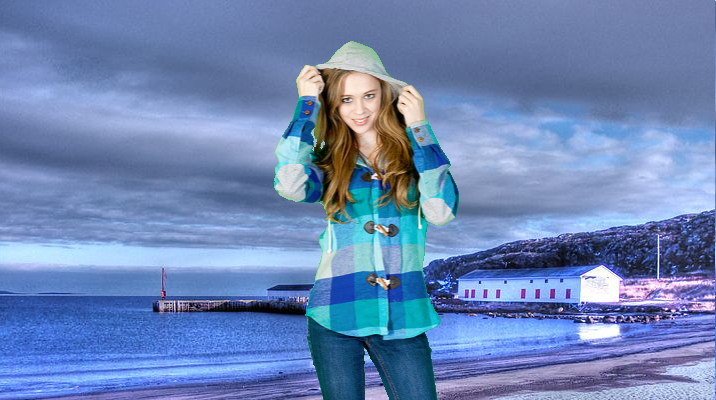
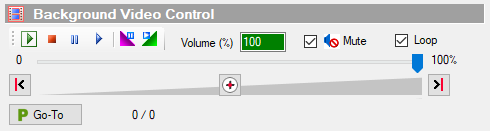
- Unload (close) the Media Screen, then click Play again to see the Media Screen with the background video or image.(Figure 3)
- If your Background Video is shorter in length than the foreground video, you can make it Loop. And if it has sound that you want to Mute, you can mute it. Both these are setting are checkboxes in the Background Video Control panel (Figure 7).
Limitations
- Chroma Key Filters DO NOT WORK when using Load Templates mode or Cross-Fade mode.
- Fade-In/Fade-Out may interfere with the filter rendering (somewhat) during the seconds a fade is processing. Fades and some filters manipulate video Opacity.
Green Screen Tips
- A green background has a much higher luminosity than a blue one, making a green screen a better choice for daytime scenes when you want your shots to look bright and well lit.
- A blue screen can be handy in scenes where you don't need so much light.
- Don't use Red Screen backdrop to record videos with people as subjects. People skin tones have an affinity to red tones and will conflict when masking out the key color. Red may be useful in specialty cases for objects that do not contain red hues.
- Try to get a canvas colored as close as possible to one of the Pure RGB colors (Figure 8). Darker key color backdrops make the color masking more difficult to completely mask out. So for example, if you have a choice between a lime-green or forest-green canvas, opt for the lighter lime-green.
- An expensive professional backdrop canvas is not required. For a low budget canvas, even a blanket, sheet or outdoor cover tarp can work. (ex web search for 'lime green sheets' )
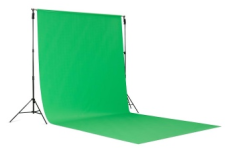
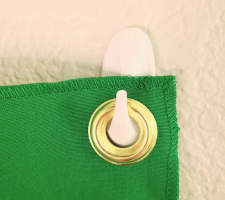
- A canvas with grommets can be easily hung against a wall with adhesive hooks (Figure 9).
- Make the lighting of the backdrop as even as possible. Stretch the backdrop canvas tight to eliminate creases and wave shadows. Avoid shiny canvas material if possible as it may reflect your light source.
- Dark gray clothing can make it harder to mask against Green and Blue screens.
- Free Green Screen Stock Videos are available for testing at the Mixkit website.
- A wide range of Free Background Stock Videos are available at the Mixkit website. There are many other websites to find royalty free videos.
- Here's a short YouTube video on "Green Screen Tips, Tricks and Materials"
Pure RGB colors are: Red: (R=255, G=0, B=0); Green(Lime): (R=0, G=255, B=0); Blue: (R=0, G=0, B=255). (Figure 8)

Footnotes:
[1] - Sample Girl in Hood image (source link) used under Creative Commons Attribution-ShareAlike 2.0 license. Original image was modified to demonstate video filter effects.
[2] - Sample Beach image (source link)