Video Mill : User's Guide
 Contents
 Language
 Product Home
Opacity Effect
 Page Bottom
Overview
 Opacity Effect (Opacity Effect)
sets the video Opacity (transparency level). Opacity animation allows you to fade the video image in and/or out.
Opacity Effect (Opacity Effect)
sets the video Opacity (transparency level). Opacity animation allows you to fade the video image in and/or out.
Settings
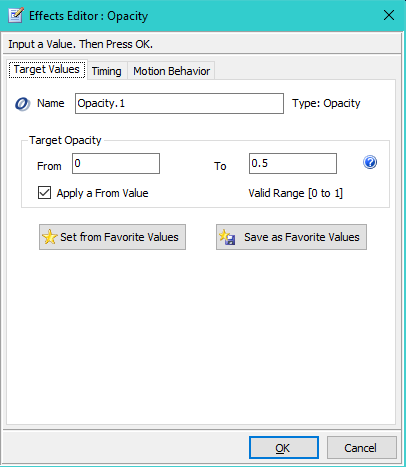
- Name - A short name to that will identify the effect's purpose.
- From - Starting value for the effect. The effect animation continues to the To value.
- To - Ending value for the effect.
- Apply a From Value - When checked, the effect uses the From value. If not checked, the effect will begin at the current value.
See the Timing section for details on timing the animation of the effect. See the Motion Behavior section for details on modifying the default behavior of the effect.
 To Page Top
Target Values
- Valid Range 0.0 to 1.0
- Special Values - Value of 0 is no opacity (fully transparent). Value of 1 is full opacity (no transparency).
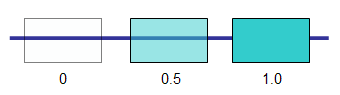
In Figure 1, Opacity levels are shown for values of 0, 0.5 and 1.
Favorite Values
As a productivity aid, you can save the entire effect (all values on all tabs) as a Favorite with the Save as Favorite Values button. Then you can set all values of an effect from the Favorite values using the Set from Favorite Values button. Separate favorites are saved for each type of effect (Opacity, rotation, etc).
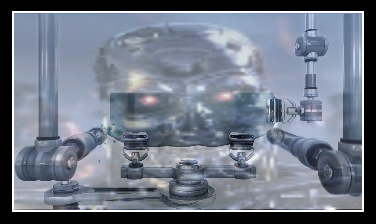
Opacity Example
In the sample Screen below , we set the Screen Background Image to the Robot Head (PNG file) and specify Image Layout to Stretch (Figure 5). The Video File is set to Robotic_Welding.MPG (Figure 4). And the Screen Opacity is set to 0.5 (50%). Notice how the Background Image comes through the video (Figure 3) when played.