
 Video Mill : User's Guide
 Contents
 Language
 Product Home
Automator - Automation Manager
 Page Bottom
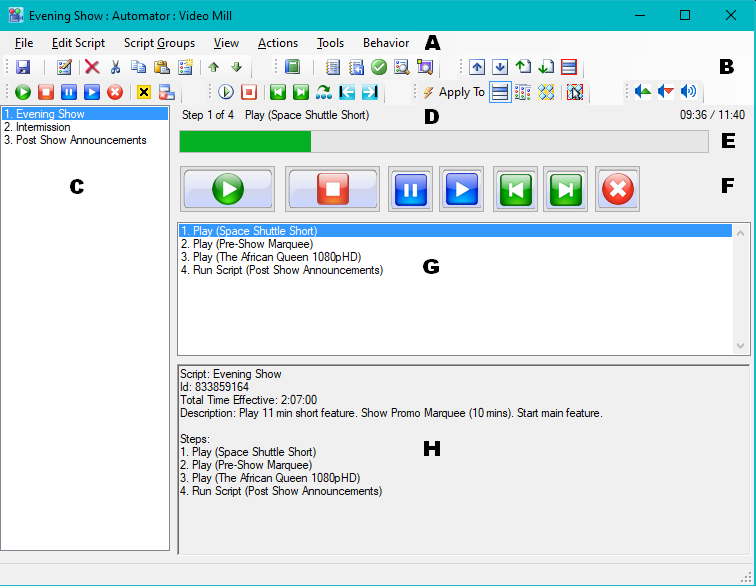
Automator main window
The Automator allows you to author automation Scripts composed of automation Steps. Then run them with the Script Run Controls buttons. The Automator window is composed of a list of Scripts (left hand column), a run progress bar, a set of over-sized Run controls buttons and a panel that shows a summary description of the current selected Script.
See the Automation Overview section for details on how Scripts work and a list of automation Steps types.
Script Run Controls buttons
The Progress Readouts information is displayed above the progress bar. The progress bar indicates Step progress for the Script -- how many steps have executed so far.
Progress Readouts
- (Figure 1, label D)
- Step number executing - The currently executing Step and number of Steps. (ex. Step 2 of 9)
- Step name - The name of the Step that is currently executing.
-
Playback Time Readout - Format, Minutes : Seconds / Duration
- Toggle Time Readout Type - Toggle playback time readout between Current Playback Time Position or Time Remaining by mouse clicking on the time readout text.
- Position - Current playback time position.
-
Remaining - Playback time remaining in the media. When showing remaining time, the time is prefixed with an hour glass symbol(
 ). (ex. 2:00/3:00)
 - Duration - Total media duration (time length).
- Total Time Effective - This shows the total effective expected run time for the Script. It calculates the total of sequential Step times, Delays, Script Repeat setting and considers any Offset Timed Steps. (Figure 1, displayed in the Script summary panel)
 To Page Top
Automator Control Panels
- A. Main Menu
- B. Toolbars
- C. Script List Selector Panel - A selection list of all Scripts.
- D. Progress Readouts - Readouts of current playing Step, time remaining and duration.
- E. Progress Bar
- F. Run Controls - Script execution buttons.
- G. Steps List Selector Panel - A list selector of the sequential steps in the script. Double-click on a Step to Play it. See actions associated to the Steps List Selector in the Actions section below.
- H. Script Description - Details of the script contents.
File menu
- Select a Script - Select a Script via pop-up dialog. Useful when the Scripts List box panel is not visible.
- Save - Saves the Media List including automation Scripts.
- Exit - Closes the Automator window. Any Scripts running when you close the window will continue to run.
- Export Selected Script to M3U Playlist - The selected Script is Exported to a M3U Playlist. Pops up a File Save dialog so you can specify the save folder and filename. It will prompt to Replace if the filename already exists. You can specify the path type to use (Absolute vs Relative path) -- see Playlist Option > Export M3U Playlists with Full File Paths.
- Quick Export: Multiple Scripts to M3U Playlists - This Quick Export allows you to export multiple Scripts in just a couple clicks. It will prompt you to select Scripts to export. It does NOT popup a File Save dialog. Playlists are saved to the folder specified when you last saved using the File Save dialog (menu item above). For duplicate filenames, it will do a simple file replace without prompting you for permission.
M3U Playlist Export
When Exporting to a M3U Playlist, ONLY Play steps are added to the playlist. For full details on Video Mill support for Import/Export of Playlists (M3U/M3U8/WPL), see the File menu page. You cannot export to WPL -- that format is import only.
Edit Script menu
The Edit Script Menu has the following functions. Some edit funtions use an Automator 'clipboard' similiar to the Windows clipboard, but they do not affect the contents in the Windows clipboard. The list is renumbered for edit actions add, delete or move items in the list.
- Edit Script - Loads the selected Script into the Script Editor.
- Create Simple Playlist - Creates a Script of Play Steps. You are prompted to pick the Media Items to play. You can then edit it like any other Script.
- View Script Description - Shows the description summary of the selected Script via pop-up dialog.
-
Change Id - Changes the Id of the selected Script. A dialog is popped up so that you can enter the new Id. You should read the section on Ids before using this action. Turn on (check)
Show Ids
in the Report Options then run a Media List Report to see all current Ids.
Notes: Each Script has an internal unique Id. Two Scripts may have the same name but will have different Ids. You can expose the Ids from the Media List window The Report Options dialog (usually only done for diagnostic reasons).
- Undo Cut - Restores a previously cut Script from the Undo stack.
- Delete - Deletes selected Script from the list. Deletes cannot be restored and are not placed in the clipboard or on the Undo stack.
- Cut - Deletes selected Script from the list. Replaces the contents of the clipboard and saves the cut item on Undo stack.
- Copy - Copies selected Script into the clipboard.
- Paste - Pastes a Script from the clipboard to the Script list at the selected position. The list is renumbered. A sequential index number is added to the end of the Script Name to make it unique.
- New Script - Adds a new Script to the Script list at the selected position. The new item will be populated with the current Default values.
- Move Up - Moves selected Script up the list by one position.
- Move Down - Moves selected Script down the list by one position.
- Move to Top - Moves selected Script to the Top of the list.
- Move to Middle - Moves selected Script to the Middle of the list.
- Move to Bottom - Moves selected Script to the Bottom of the list.
- Refresh All Scripts - If you change a Media Item name in the Media List Editor or make other changes that can affect Step time durations, you will have to refresh scripts so that the steps reflects the changes. Total Time Effective is recalculated.
Move Script tool bar button behavior
Edit Script tool bar
Edit Script tool bar
Buttons (Figure 2, from left to right): Save Media List, Edit Script, Delete , Cut, Copy, Paste, New Script, Move Up, and Move Down.

Script List Item Selection tool bar
Script List Item Selection tool bar
These buttons move the list selection cursor to change the current Script selection in the Script List (Figure 1, label C). This tool bar is useful when scaling up tool bar size for using the program as a touch screen interface. Buttons (Figure 3, from left to right): Previous Script, Next Script, Page Up, Page Down, Focus Script List panel.

Script Groups menu
See the separate page for details on Script Groups.
View menu
The View menu items are listed on the Automator - Tablet and Touch Screen Operation page.
Actions menu
Works with  Action Apply-To Mode.
(some Actions)
Action Apply-To Mode.
(some Actions)
Script Actions
- Run Script - If the selected Script is already running, the request is ignored. If the Script is NOT running it will be started. And it will start execution at the Step index of the selected Step in the Steps List Selector (Figure 1, label G).
- Run Multiple Scripts** - Starts two or more Scripts running at the same time. You are prompted to select the Scripts to run.
- Run Script at Step(x) - Starts the selected Script to run at a Step that you pick via pop-up dialog. Only sequential steps are selectable (ie no timed steps). If the Script is already running, it is restarted at the selected step.
- Stop - Stops the selected Script. Media Screens are not Unloaded (closed). If fading is in effect, Media Screens will fade-out to the stop.
- Pause - Pauses the selected Script and any playing Media Screen videos that were started by this Script are paused.
- Resume - Resumes the selected Script and any paused Media Screen videos that were started by this Script are resumed.
- Stop Script and Unload Screens - Stops the selected Script. And any Media Screen(s) loaded by this Script will be unloaded. Even if fading is in effect, Media Screens will stop abruptly as a result of the Unload.
-
Script List Selection
- Select Previous Script - Selects the Previous Script in the Script List panel (Figure 1, label C).
- Select Next Script - Selects the Next Script in the Script List panel.
- Halt All Running Scripts - When clicked, all Scripts currently running are stopped.
- Stop All Scripts - When clicked, all Scripts currently running are stopped including the scheduler Scripts.
- Unload All Media Screens - When clicked, ALL Media Screens currently loaded are then unloaded. It doesn't matter which Script loaded the Media Screens.
- UnLoad Multiple Screens - Unloads a selection of Media Screens. You are prompted to select the Screens.
-
Volume - These volume changes apply only to Media Screen(s) that were started by this Script.
- Volume Bump Up - Media Screen Volume is bumped Up by the Percent(%) specified in the Media Item Options.
- Volume Bump Down - Media Screen Volume is bumped Down by the specified Percent(%).
- Volume Mute Toggle - Media Screen Volume is toggled between Mute and Un-muted.
- Stop All - When clicked, all currently playing media is stopped including Scripts, the Scheduler, and items in the Media List editor.
- Pause All - When clicked, all currently playing media is paused including Scripts, the Scheduler, and items in the Media List editor.
- Resume All - When clicked, all currently paused media is resumed including Scripts, the Scheduler, and items in the Media List editor.
Note on Volume Bumps - The current volume is reported on the status bar when clicking either Volume Bump button. If more than one Media Screen volume is changed, it will show the volume of the last Media Screen that was changed.
Step Actions
- Play/Replay Step - The selected Step is played (or replayed) from its start. The selection is from the Steps List Selector (Figure 1, label G).
- Stop Step - Selected Step is stopped.
- Next Step - Script execution advances to the Next sequential Step. If Next is clicked when the last Step is playing, it will end the Script.
- Previous Step - Script execution advances to the Previous sequential Step.
- Jump to Step(x) - Script execution advances to a selected Step. You select the Step via pop-up dialog.
- First Step - Script execution advances to the First sequential Step.
- Last Step - Script execution advances to the Last sequential Step.
Step Actions Notes: 1) The selected Script must be running for any of the step actions to be performed. 2) Step actions above apply only to sequential Steps. Offset Timed Steps are ignored.
Actions Warnings
*Step Advance while a Fade is In-Progress
 Warning - Advancing steps (with Next, Previous, First, Last, or Jump to Step buttons) while a fade effect is in progress can produce unpredicable results. Fade effects include: AutoFade-In, AutoFade-Out, or Cross-Fade. Wait for the few seconds until a fade completes before clicking any of the Step Advance buttons. If you do this by accident you may end up with two videos partially faded into each other and both likely paused. To resolve this, click the Replay Step button and the video should start its play.
**Run Multiple Scripts Simultaneously
Warning - If you start multiple scripts simultaneously and they include Play Steps, you should ensure the following settings: 1) Set Screens Mode to Multi-Screen; 2) Do NOT use Load Templates; 3) Do NOT use Cross-Fade Mode. Otherwise, Play Steps will be competing for a single Media Screen and when one Play Step executes it will cancel another. In some cases, the automator will prevent a second script from running if it is known to cause an error condition.
Steps List Selector
The Steps List Selector (Figure 4) is an active control. It has some behaviors associated to the actions above.
Behaviors
- When you click the Run Script button, it will start executing at the selected Step.
- If you double-click a Step, it will begin executing. (Script must be currently running)
- If you select any Step, then click the Play Step button (Figure 6), the selected Step will Play (or Replay if the selection is the same as the current playing step).(Script must be currently running)
- Only sequential steps are listed in the Steps List. (ie no timed steps are listed here)

Run Script tool bar
Works with Action Apply-To Mode.
Run Script tool bar
Buttons (Figure 5, from left to right): Run Script, Stop, Pause, Resume, Stop and Unload Script, Halt All Running Scripts, Unload All Media Screens.

Step Actions tool bar
Step Actions tool bar
Buttons (Figure 6, from left to right): Play/Replay Step, Stop Step, Previous Step, Next Step, Jump to Step(x), First Step, Last Step.

Volume tool bar
Works with Action Apply-To Mode.
Volume tool bar
Buttons (Figure 7, from left to right): Volume Bump Up, Volume Bump Down, Volume Mute Toggle.

Tools menu
- View Automator Log - Show the contents of the Automator log file which contains Step execution time stamps and any detected error messages.
- Reset Automator Log - Resets the log clearing all old messages.
- View Running Scripts - Pops up a window listing all currently running Scripts.
- Generate Report - Generates a Media Plot report or all Media Items and Scripts . The Report Options dialog allows you to specify the detail level of the report.
- Validate All Scripts - Analyzes all Steps in all Scripts for potential errors or Script logic issues.
- View All Loaded Screens Dimensions - When clicked, it pops up a dialog showing screen Dimensions of all loaded Media Screens. The Media Screen Window Dimensions (includes Window Title bar and Window borders) and the Media Screen Rectangle Dimensions (Video Viewing Rectangle) are shown. When the Window Title bar is hidden, the Window Dimensions and Media Screen Rectangle Dimensions will be the same values. This also displays screen coordinates for all extended desktop displays.
-
Actions Shortcuts - The Actions Shortcuts are intended to facilitate operation of the Automator by a remote control device.
- Select Current Actions Shortcuts - Pops up a list of all Actions Shortcuts definition. Select the one you want to use for your remote. Actions menu items are reset with these Shortcuts.
- Manage Actions Shortcuts - Opens a list of your Actions Shortcuts. You can: Add new Shortcuts; Duplicate existing Shortcuts; Edit existing Shortcuts; or Delete Shortcuts.
- View All Actions Shortcuts - Shows all Actions Shortcuts settings via pop-up dialog.
- Add Windows Media Player Shortcuts to Actions - Adds a Shortcuts definition for a Windows Media Player remote device.
- Add PowerPoint Shortcuts to Actions - Adds a Shortcuts definition for a PowerPoint remote device.
- Add Video Mill Shortcuts to Actions - Adds a Shortcuts definition to Actions Shortcuts for Video Mill default actions shortcuts. Useful if you want to swap back to Video Mill default actions without having to close and restart Video Mill.
Add pre-configured profiles
- If you have a remote controller designed for Windows Media Player or PowerPoint, these items will add a preconfigured Shortcuts profile for the device. You can make further edits to this Shortcuts definition if desired.
- Ad Hoc Shortcuts - Similar to Actions Shortcuts, these allow you to link a specific Media Item or Script to a shortcut. See separate Ad Hoc Shortcuts page.
- Window Focus - Allows you to focus an app window (Media List Editor, or Automator). It makes the window active so it can receive remote controller key signals.
-
Menu Items Shortcut Keys - These items manage the shortcuts that appear on the Automator menu items.
- View Menu Items Shortcut Key Summary - Shows the current active Keyboard Shortcuts settings for all Automator menu items -- via pop-up dialog.
- Remove All Menu Item Shortcuts - Removes all Keyboard Shortcuts from all Automator menu items. Useful when a Keyboard Shortcut is applied to an Automator menu item and you want to use it for an Actions menu item.
- Reset All Shortcuts to Program Defaults - Restores all Automator menu items to the program default Shortcuts. This requires a program restart to take effect.
Tools tool bar
Tools tool bar
Buttons (Figure 7, from left to right): Generate Report, View Automator Log, Reset Automator Log, Validate All Scripts, View Running Scripts, View All Loaded Screens Dimensions.

Behavior menu
These items change the behavior of the Automator when running Scripts. They are generally useful for running the Automator by wireless remote controllers.
Menu items
- EoM2N - Auto-Execute on Move to Next Step - When checked (true), when the current Step pointer is moved from one step to another, the Step will be automatically executed (ie played if it is a Play step).
- AM2NS - Auto-Move to Next Step - When checked (true), when a sequential Step finishes executing (ie. for Play steps when play ends), the current Step pointer is automatically moved forward one Step. Clicking the Stop Step button will also cause the auto-move forward.
-
Input Device - Remote Controller - When checked (true), the Automator will perform additional tasks to enable operation by a Remote Control device. Also, Options > Screens(2) > Refocus Program Window After Media Screen Loads is set to true (required). This mode will consume keyboard key presses for Shortcuts (Actions and Adhoc). The effect is that the Arrow keys (Left, Right, Up Down) and Tab key will not select Next and Previous items in the Automator lists. You will need to use the mouse for list item selection in this mode.
When unchecked (false), the Automator will NOT operate in Remote Controller mode (ie assumes keyboard, mouse or touch screen input). So Shortcuts (Actions and Adhoc) do not work in this mode. - Run button performs Run/Pause/Resume - Toggles this mode between On/Off (Active/Inactive). When Active, the Run button will act as a combined Run/Pause/Resume button. When unchecked, the Run button will only start a script and the Pause/Resume buttons will perform pause/resume. This is provided for use by some remote controllers that do not have a separate buttons for pause/resume.
- Slide Show Setup - See section below for explanation.
-
Actions Shortcuts mode - Toggles this mode between On/Off (Active/Inactive). When Active, processing of remote controller Actions Shortcuts is enabled (turned on).
- Note: This feature should only be enabled when using a remote control device. It may remove some menu item shortcuts from the Automator to avoid duplicates of a given key signal. To restore the Automator menu item shortcuts, uncheck this mode, then close and restart Video Mill.
-
Ad Hoc Shortcuts mode - Toggles this mode between On/Off (Active/Inactive). When Active, processing of remote controller Ad Hoc Shortcuts performs as they arrive. When disabled, Ad Hoc Shortcuts are ignored. (Also see Actions Shortcuts Note above.)
This operation has a Reserved PowerKey. (More Info)
- Enable Remote Controller Special Keys - Toggles this mode between On/Off (Active/Inactive). Some special keys need special handling because Windows uses them for navigating controls like listboxes. Special keys include: Arrow keys (Up, Down, Left, Right), Tab, Home, End, PageUp, PageDown. Recommended: If your Remote Control Device sends any of these special key signals, this menu item should be checked (enabled). Otherwise, keep it disabled.
- Check for Duplicate Shortcuts - Checks to see if you have defined any Shortcuts (Ad Hoc and Actions Shortcuts) that have the same shortcut keys (example, Two shortcuts with shortcut keys "Ctrl+S").
- View Behavior Summary - Shows a list of current Automator Behavior settings.
Setting EoM2N and AM2NS
Here's how to set EoM2N and AM2NS to give the Automator common app behaviors.
| EoM2N | AM2NS | Automator Behavior |
|---|---|---|

|
|
EoM2N(checked), AM2NS(checked). Emulates a Standard Media Player (example WMP, Windows Media Player). Total automation mode. Will play a sequential playlist of videos or images from start to end by simply starting a Script. |
| __ | __ | EoM2N(un-checked), AM2NS(un-checked). Emulates a Slide Show Presentation Program (example Power Point). Manual operation mode requiring the user to push the Next (or Previous) button to advance through a "slide" show. Click the Play Step button to play the current Step. |
|
|
__ | EoM2N(checked), AM2NS(un-checked). Like the Slide Show Presentation mode above. User controls when the focus advances by clicking the Next button. But when you advance to the next Step, the Step will automatically Play. (Useful for some remote controllers with limited control buttons) |
| __ |
|
Like the Slide Show Presentation mode above, except focus automatically moves to the next Step when the current playing Step ends. Then the user starts the Step by clicking the Play Step button. (Useful for some remote controllers that do not have Next/Previous buttons) |
Warning -
When running the Automator in
Cross-Fade mode
, both EoM2N and AM2NS items MUST be checked or you will not achieve the desired fade effect.
Slide Show Setup
To make Video Mill behave like a slide-show app (similar to MS PowerPoint), there are multiple settings that need to be modified. The Behavior > Slide Show Setup menu item automates the setup settings for you. It will ask several questions about how you want your slide show to look/behave then make the appropriate settings. It configures Video Mill to use a Full Screen Load Template (Global Load Template). This setup could affect scripts already in progress, so it is best to do this when no automation is running.
Questions asked
- Target Display - You pick the display where you want the slides to appear. If a Full Screen Load Template does not exist for that display, one will be created. The template is set as the Global Load Template.
- Cross-Fade Slides - Decide if you want slides to cross-fade one into the next.
- Timed Slides or Manual Advance - Timed slides advance automatically at a set time interval. You are prompted to set the interval. If you pick Manual Advance, you will use the Automator Next Step button to advance between slides.
Settings Changed
- Cross-Fade Mode.
- Global Load Template (current).
- Load Template Mode set to Global Only.
- Default Image and Text Screen Duration. (in Media Item Options)
- Automator Behavior - EoM2N and AM2NS set to true. (see above)