Sound Mill X3 : User's Guide
 Contents
 Language
 Product Home
Quick Start
 Page Bottom
Just the Basics
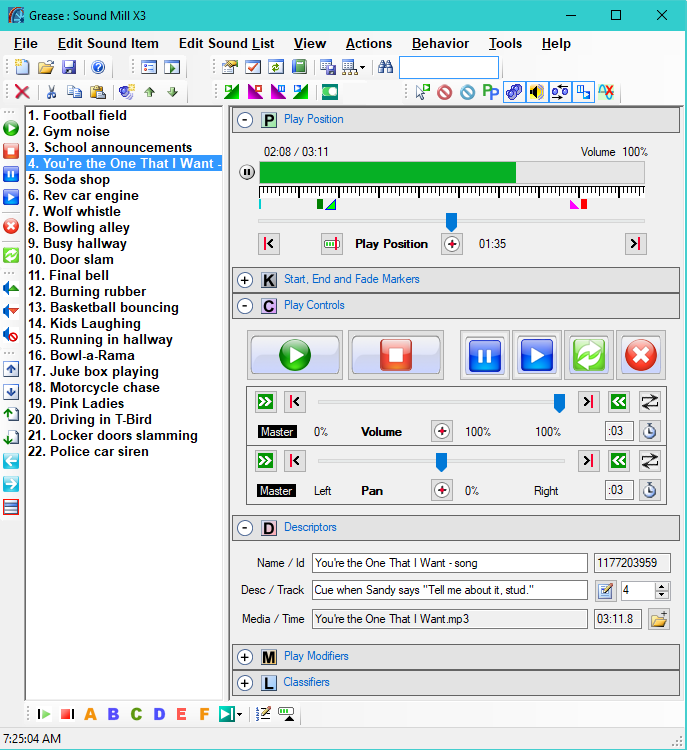
This is all you need to know to get started with a basic Sound List. The following steps explain how to setup a list of sounds and play them. See the rest of this help document for instructions on using advanced features.
A Sound List (Sound List)
is made up of multiple Sound Items (Sound Items)
which are displayed in the Sound List Editor (left side). Using the
Sound Item Editor
panel (right side), you apply attribute values to each Sound Item. Attributes include things like the associated Media File name and play modifiers (how
Sound Mill
should handle its play).
Sound Lists
retain all the attribute information so at the time of the performance, you need only click the play button. You should understand that
 To Page Top
Building and Editing a Sound List
- Sound List name- You can name the list to something that logically identifies it. For example, "Grease Act I". Click Edit List -- Name to set the name.
- Add audio sounds by drag and drop- For productive editing you can drag and drop Media Files into the Sound List panel from Windows Explorer (or most any file manager). A new Sound Item is added to the list for each dropped file. Sound Items are inserted at the position of the current selected item. It takes a quarter of a second to process each file dropped, so if you drop a lot of files, expect a short delay. You can also drop a folder of Media Files. And you can drop a saved Sound List to open it.
-
Add a single audio sound- Click an existing Sound Item in the list where you want to add a new one. Then click the
New Sound Item
button on the
Edit tool bar
. Once the new item is added, use the
Browse
button on the
 Descriptors
panel to set the item's Media File name.
Descriptors
panel to set the item's Media File name.
- Moving sounds in the list- Click on the Sound Item in the list, then use the green Up/Down arrow button on the Edit tool bar to move the Sound Item to a different position in the list.
-
Copy/Cut- Click on a Sound Item in the list, then use
Copy
or
Cut
button to copy the selected item into the
Sound Mill clipboard. All attributes of the item are copied. Cut also removes the selected item from the list. Cut does NOT remove the physical Media File from your computer. -
Paste- Click the
Paste
button. The Sound Item in the
Sound Mill clipboard is pasted into the list at the position of the current selected Sound Item.
 Edit tool bar
Using Play Controls
-
Play a sound- Click on the Sound Item in the list, then click the
Play
button on the
 Play Controls
panel . The sound plays from the beginning. Multiple sounds can be played at the same time. For example, start the sound of rain fall in loop mode and occasionally play a thunder sound.
Play Controls
panel . The sound plays from the beginning. Multiple sounds can be played at the same time. For example, start the sound of rain fall in loop mode and occasionally play a thunder sound. - Stop a sound- Click on the Sound Item in the list, then click the Stop button. This also has the affect of resetting the sound to the beginning (aka rewind).
- Pause a sound- Click on the Sound Item in the list, then click the Pause button. Play is now paused.
- Resume a sound- If the sound has been previously paused, click the Resume button and play resumes from the position where it was paused.
- Volume- Drag the Volume slider to lower or raise the volume of the sound.
- Pan- Drag the Pan slider to move the sound from left or right speakers.
 Play Controls tool bar
Setting Descriptors
-
Name- Each Sound Item has a
Name
field located on the
Descriptors
panel. You can set the Name as desired to identify the Sound Item in the context of your production. It is best to keep it short (a few words max) but the is no character limit. Name is used to identify each item in the Sound List.
- Description- This allows you to add comments or instructions for the sound engineer who is operating the sound console. This can be multiple lines of text.
- Media File- Each Sound Item has an associated audio or video file. You can change the Media File at any time using the Browse button. The time duration of the sound is displayed next to the filename.
Saving and Re-opening the Sound List
- Save- Click File -- Save to save the Sound List for future use. The default Sound List file extension is '.slt'.
- Open- Click File -- Open to open a previous saved Sound List.