Sound Mill X3 : User's Guide
 Contents
 Language
 Product Home
Start and End Markers group
 Page Bottom
Locator: Sound List Editor.
First, you need to make the
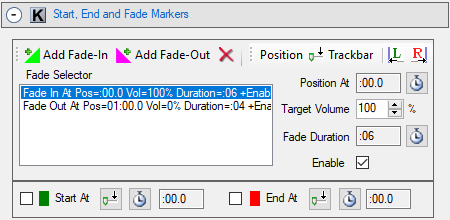
 Start, End and Fade Markers
group visable
by clicking its section header bar (Figure 2).
Start, End and Fade Markers
group visable
by clicking its section header bar (Figure 2).
Overview
-
Start-At marker - (
 ) When you play a Sound Item, it will begin playing at this time marker position.
 -
End-At marker - (
 ) When you play a Sound Item, it will stop playing at this time marker position.
These markers do not change the physical Media File. You enable these markers by checking the Enable checkmark (Figure 2). The Start At and End At markers appear visually along the placement time-line ruler (Figure 1). When a marker is disabled, the shape will be outlined with no color fill. You never actually delete these markers. They are just turned on and off with the Enable checkmark.
Note: If you change Start, End or Fade Markers while a Sound Item is playing, these values are not applied until the next time the Sound Item is played.
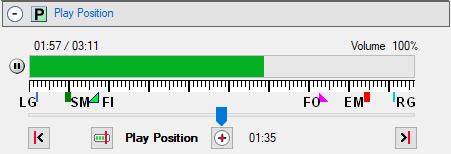 Start-At marker;
FI
Start-At marker;
FI  Fade-In marker;
FO
Fade-In marker;
FO  Fade-Out marker;
EM End-At marker;
RG Right Guide.
Fade-Out marker;
EM End-At marker;
RG Right Guide.
Also see, Enable Start and End Markers in the Behavior menu that allows you to turn Start and End markers on and off globally without having to edit each Sound Item to enable / disable individual checkmarks.
 To Page Top
Setting a Start-At or End-At Marker
-
The process of setting
Start At
and
End At
markers is the same.
-
Set the marker postion - Move the
Play Position
scrubber trackbar slider (Figure 1.) to a desired time position. Now click the
Set Position from Trackbar
button (
 ) (Figure 2.). The marker position is set to the value of the trackbar slider.
You can also set a precise position time by clicking the
Set Time
button (
) (Figure 2.). The marker position is set to the value of the trackbar slider.
You can also set a precise position time by clicking the
Set Time
button ( ) which will pop-up a time set dialog.
 - Enable the marker - Click the Enable checkbox (directly to the left of the marker color icon).