
 Sound Mill X3 : User's Guide
 Contents
 Language
 Product Home
Play Controls Functions
 Page Bottom
Locator: Sound List Editor.
Play Controls
The
 Play Controls
group (Figure 3.) has the following functions. Multiple sounds can be played at the same time. For example, start a sound of 'city street noise' in loop mode then on cue play a 'car horn honking'.
Play Controls
group (Figure 3.) has the following functions. Multiple sounds can be played at the same time. For example, start a sound of 'city street noise' in loop mode then on cue play a 'car horn honking'.
First, select a Sound Item in the list. These controls will operate on the selected sound item.
- Play- Click the Play button. The selected Sound Item plays from the beginning. If you hit Play multiple times, the Media File will play multiple times concurrently.
- Stop- Click the Stop button to stop the selected Sound Item from playing. This also has the affect of resetting the sound to the beginning (a.k.a. rewind).
- Pause- Click the Pause button to pause play of the selected Sound Item at the current position.
- Resume- Click the Resume button to continue play from the postion it was paused.
- Refresh sound- Click the Refresh button to apply edits that are saved from editing markers.
- Stop All- The Stop All button stops all sounds currently playing (not just the selected Sound Item).
- Volume- Drag the Volume slider to lower or raise the volume of the sound. Can also be operated in automatic scroll mode (See Figure 3).
- Pan- Drag the Pan slider to move the sound from left or right speakers. Can also be operated in automatic scroll mode (See Figure 3).

 To Page Top
Play Controls tool bar
- Play Controls tool bar - Buttons (Figure 2, from left to right): Play, Stop, Pause, Resume and Stop All, and Refresh.

Automatic Operation of Volume and Pan
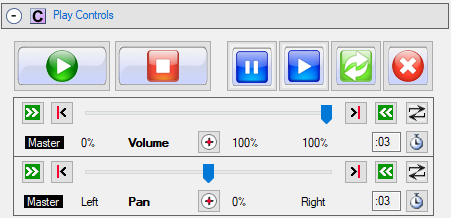
You can perform a controlled fade or gain of volume or controlled pan left to right speaker as follows. The volume or pan slider will scroll automatically in a smooth motion at the current speed setting. Using these controls when fade-in or fade-out markers are enabled can cause unexpected results. It is best to use one or the other.
-
Set Auto-Scroll Duration- Sets the
Duration
time (
 ) -- The amount of time it takes to scroll from one end of the trackbar to the other end. A longer Duration implies a slower scroll speed.
 -
Auto Scroll- Click the
Auto Scroll Right
(
 )
or
Auto Scroll Left
(
)
or
Auto Scroll Left
(  ) to start the automatic movement of the slider in either direction. The slider position marker will traverse the track to the end and then stop. Clicking the button again will stop auto-scroll if it is in progress.
-
Auto Reverse- You can put the auto movement into a loop by clicking the
Auto Reverse
(
 )button . When the slider position marker reaches either end of the track it will reverse direction and continue scrolling. When auto reverse is active, the button background will be highlighted.
Volume and Pan Quick Set Buttons
There are three buttons for quick setting of the slider position marker without having to drag the marker:
Set Left
(  ),
Center
(
),
Center
(  ) and
Set Right
(
) and
Set Right
(  ) buttons . Clicking these buttons will stop auto-scroll if it is in progress.
Applying Volume and Pan as Master Settings
The volume and pan settings can be applied to all Sound Items as master settings. See Behavior menu to select these modes.
Or you can save volume and pan settings with each individual Sound Item. In this mode, when you select a new Sound Item in the list, the volume and pan slider settings are adjusted based on the saved values for that Sound Item. This is useful if you want fine grained control over each Sound Item.
About Volume
Windows Master Volume Setting
Volume settings made in
Playback real volume (volume as perceived by the human ear in dB ) may be somewhat different based on the sound driver used, Windows Audio (WA) driver or Media Player (MP) driver.
MIDI Limitation - The MP audio driver does not adjust volume for MIDI format, so volume adjustments with the Volume trackbar, Mute, or Fade operations will have no effect with MIDI audio files. MIDI files will play at the Windows Master Volume set for the device. The WA audio driver does not play MIDI.
Setting a Maximum Volume
You can control the Maximum Volume (cutoff point) for a Sound Items regardless of how high you move the volume slider control. Fade-In operation will also stop increasing the volume when it reaches the Maximum Volume. You can set Maximum Volume on a single Sound Item or set Master values that affect all Sound Items. Currently playing Sound Items are not affected by changes to these settings until play ends and the next Sound Item is played. In automation scripts, the change will take effect when the next Play Step executes.
The Master settings may be a good way to prevent jarring volume spikes on powerful sound systems without having to manually adjust volumes on all Sound Items. The separate master settings for Announcements and non-Announcements Sound Items makes it useful for making your Announcements louder (or quieter) than music playlist items.
Maximum Volume on Individual Sound Items
In the Sound Item Play Modifiers, you can set the Maximum Volume for a single Sound Item. If the Master Maximum Volume settings enabled, the lower value of the two will be used.
Master Maximum Volume for All Sound Items
In the Sound Item Options, there are two Maximum Volume - Master Controls: 1) for Announcements; 2) for all other Sound Items (non-Announcements, music programming, etc). When you are combining Music playlists with occasional Announcements, you may want the Announcements to have a higher volume than the music. These settings are an easy way to accomplish this.