
 Sound Mill X3 : User's Guide
 Contents
 Language
 Product Home
Fade-In and Fade-Out Markers
 Page Bottom
Locator: Sound List Editor.
Overview
 IMPORTANT: Disable Auto-Fades when using Fade Markers. They will interfere with each other and cause undetermined results.
Expose the
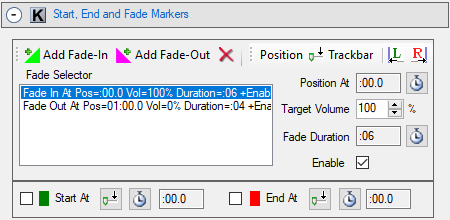
 Start, End and Fade Markers
group controls by clicking its section header bar (Figure 2).
A Fade Marker allows you to automatically Fade-In(increase) or Fade-Out (decrease) the volume at any position along the play timeline. You can control the Fade Duration of the fade (faster or slower). Duration is the time it will take to fade from 0% to 100% volume (or vice versa).
And you can set a Target Volume, which when reached, fading will stop. So for instance you do not have to fade-in all the way to full volume or fade-out to total silence. You can apply as many fade markers as you want. See Figure 1. for visual placement of markers along the time-line ruler.
Start, End and Fade Markers
group controls by clicking its section header bar (Figure 2).
A Fade Marker allows you to automatically Fade-In(increase) or Fade-Out (decrease) the volume at any position along the play timeline. You can control the Fade Duration of the fade (faster or slower). Duration is the time it will take to fade from 0% to 100% volume (or vice versa).
And you can set a Target Volume, which when reached, fading will stop. So for instance you do not have to fade-in all the way to full volume or fade-out to total silence. You can apply as many fade markers as you want. See Figure 1. for visual placement of markers along the time-line ruler.
-
Fade-In marker - (
 ) When playing a Sound Item, when play hits a Fade-In marker Position the volume will begin to increase volume until the volume reaches the Target Volume. If the current volume is already higher than the Target Volume, it will have no effect.
 -
Fade-Out marker - (
 ) When playing a Sound Item, when play hits a Fade-Out marker Position the volume will begin to decrease volume until the volume reaches the Target Volume. If the current volume is already lower than the Target Volume, it will have no effect.
These markers do not change the physical Media File. You enable these markers by checking the Enable checkmark (Figure 2). The Fade marker appear visually along the placement time-line ruler (Figure 1). When a marker is disabled, the shape will be outlined with no color fill. The marker is ignored during playback if the Enable checkmark if unchecked.
To better understand Fade Markers, first review the related information About Volumes . Also, the Tools -- Quick Markers operations provide a quick method to add fades and set marker positions on multiple Sound Items. Also see, Enable Fade Effects in the Behavior menu that allows you to turn fading effects on and off globally without having to edit each Sound Item to enable / disable individual enable checkmarks.
Note: If you change Start, End or Fade Markers while a Sound Item is playing, these values are not applied until the next time the Sound Item is played.
Fade Duration and Behavior
A volume of 100% represents the original recorded, unadjusted volume of the sound. A 0% volume is effective silence however the sound usually becomes inaudible before 0% is reached. Duration is the amount of time it will take to go from 0% to 100% (longer duration implies slower fade rate). If a fade marker Target Volume is set somewhere mid-range, it will take a percentage of the Duration time to complete. For example, if a fade marker Duration is 6 seconds and begins at 0% volume with a Target Volume of 50%, it will take 3 seconds to complete (half of the Duration time).
If a fade effect has not completed (reached its target volume) when another fade marker is reached, the new fade effect will begin and the previous fade is stopped. Fades that are placed before the Start At marker will begin to execute when the sound is started.
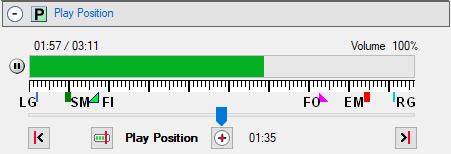
 Start-At marker;
FI Fade-In marker;
FO Fade-Out marker;
EM
Start-At marker;
FI Fade-In marker;
FO Fade-Out marker;
EM  End-At marker;
RG Right Guide.
End-At marker;
RG Right Guide.
 To Page Top
Using Marker Guides
Guide Positions are used to quickly set a marker to a preset position (a Guide). The Set Marker to Guide quick set buttons ( ,
,  ) are shown in Figure 2 (upper left corner of the image). The Guide positions are shown in Figure 1 -- the two (blue) vertical lines at either end of the marker placement ruler. The Left and Right Guide Positions are set in the
Options -- Markers
tab. The Marker Guides are defined as Time values (in minutes:seconds, mm:ss). They are used as follows:
) are shown in Figure 2 (upper left corner of the image). The Guide positions are shown in Figure 1 -- the two (blue) vertical lines at either end of the marker placement ruler. The Left and Right Guide Positions are set in the
Options -- Markers
tab. The Marker Guides are defined as Time values (in minutes:seconds, mm:ss). They are used as follows:
- Left Guide - Positions a marker at the Left Guide Position from the start of audio. So if the Left Guide is set to 20 seconds, the marker is placed 20 seconds past the start of audio. (Factory default: 0 seconds)
- Right Guide - Positions a marker at the Right Guide Position. This is a calculated position based on the length of the audio file. It is calculated by subtracting the Right Guide time value from the length (duration) of audio. So if the Right Guide is set to 10 seconds, and the audio is 3 minutes long, the marker is placed at the 2min:50sec point. (Factory default: 10 seconds)
Adding and Setting a Fade-In Marker
These operations work on the Selected marker (Figure 2.) in the marker list (except add which adds a new marker into the list). Markers are automatically sorted according to time position after each operation.
-
Add the marker - Click the
Add Fade In
(
 ) button (Figure 2.). A Fade In marker will appear as a green triangle the sound play timeline (Figure 1.).
 - Set the Fade Target Volume - Type a number (0% to 100%) into the Target Volume textbox .
- Set the Fade Duration - Click the Duration button to change the Fade Duration time (Figure 2).
-
Set the Fade Position - Move the
Play Position
scrubber trackbar slider (Figure 1.) to any position. Now click the
Set Position from Trackbar
(
 ) button (Figure 2.) . The marker position is set to the value of the trackbar slider.
You can also set a precise position time by clicking the
Set Time
button (
) button (Figure 2.) . The marker position is set to the value of the trackbar slider.
You can also set a precise position time by clicking the
Set Time
button ( ) which will pop-up a time set dialog.
-
Set Position to Guide - The marker Position can also
Set to Left Guide Position
() or
Set to Right Guide Position
() by clicking the respective button. (Figure 2.) To change guide positions, see the
Options -- Markers
tab.
Adding and Setting a Fade-Out Marker
-
Fade-Outs are setup with the same mechanics as Fade-Ins with the following differences.
-
Add the marker - Click the
Add Fade Out
(
 ) button (Figure 2.). The marker should appear as a magenta triangle along the play progress bar (Figure 1.) .
 - Fade Target Volume - When setting the Target Volume remember Fade-Outs will decrease from the current volume until the target volume is reached. So you will set the target volume to a low value, usually 0%.
- Fade Duration - Same process as setting for Fade-In marker.
- Fade start postion - Same process as setting for Fade-In marker.
Testing a Fade Marker
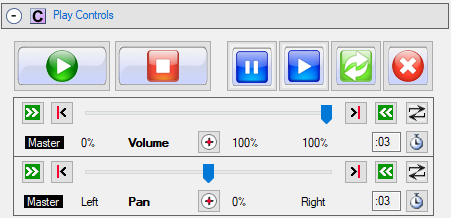
Add a Fade-In marker at Position 5 seconds (Pos=:05). Select the marker in the Fade Selector list (Figure 2). Set its Target Volume to 100%. Move Volume trackbar slider position (Figure 3.) to the volume at which you want the sound to start playing (try 10% volume). Now click the Play button. When play reaches the marker time position, the volume should begin fading in (increasing) until it reaches the Target Volume (100%).
Editing an Existing Fade Marker
After you add a marker, it will appear in the Fade Selector list (Figure 2., just below the Delete Fade button) . To change values, select it from the Fade Selector list . Then any edits you make to the volume, duration or postion fields will apply to this fade.
Enabling / Disabling a Fade Marker
When the Enable checkbox is checked, the marker is enabled and will produce the fade affect during play back. When disabled, it will have no volume affect during play. Disabled markers will appear as outlined triangle shapes with no color fill along the play timeline ruler.
Deleting a Fade Marker
Select an existing marker from the Fade Selector list , then click the Delete Fade button (upper right of Figure 2).
About Quick Markers
First, read the Choosing Auto-Fades vs Fade Markers paragraph at the top of this page, to decide which type of fades you need.
To better understand Fade Markers, first review the related information
About Volumes
.
A common operation for music files is to fade-in and/or fade-out volume at the beginning and end of the audio file respectively. Quick Markers was designed to do this in a few clicks. It is also flexible enough to achieve other repetitive adds and moves of markers.
Quick Markers - menu items
Menu Locator: Sound List Editor > Tools > Quick Markers .
For these Quick Markers operations, you are prompted (via popup dialog) to select Sound Items you want to operate on. For the operations that require a source value, the value will be taken from the current Default Attributes.
- Add Fade Markers - Adds fade markers to the selected set of sound items as described below.
- Add Both, Fade-In And Fade-Out - Adds a Fade-In and a Fade-Out marker to each selected Sound Item.
- Add Fade-In - Adds a Fade-In marker at the Left Guide Position to each selected Sound Item. The values of the marker (Target Volume, Fade Duration, and Enabled state) are taken from any Fade-In marker in the Default Attributes (or factory default values for Fade-In if there is none in the Default Attributes).
- Add Fade-Out - Adds a Fade-Out marker at the Right Guide Position to each selected Sound Item. The values of the marker (Target Volume, Fade Duration, and Enabled state) are taken from any Fade-Out marker in the Default Attributes (or factory default values for Fade-Out if there is none in the Default Attributes).
- Set Sound Item Initial Volume for Fade-In - Sets the initial Volume from Default value on each selected Sound Item. The Default value can be changed in the Options -- Markers tab. Typically on Fade-In of music audio, you want the sound to start at 0% (silence) and rise up to the Fade-In target volume. This give a quick way to assign the start Volume to any value.
-
Move Marker to Right Guide Position
- Moves the marker type that you select to the Right Guide Position on each selected Sound Item. (if the marker is not found in the Sound Item, there is no action.)
- Fade-In, Fade-Out, Start At, End At - Selects the marker type to move.
-
Move Marker to Left Guide Position
- Moves the marker type that you select to the Left Guide Position on each selected Sound Item. (if the marker is not found in the Sound Item, there is no action.)
- Fade-In, Fade-Out, Start At, End At - Selects the marker type to move.
- Delete Fades - Delete All Fades (Fade-In and Fade-Out markers) on each selected Sound Item.
Factory default values
for Fade Markers are:
Fade-In marker: Positioned at 0, Target Volume 100%, Fade Duration 3 seconds.
Fade-Out marker: Positioned at 10 seconds from end of audio, Target Volume 0%, Fade Duration 3 seconds.
Right Guide Position: Positioned at 10 seconds from end of audio.
Left Guide Position: Positioned at start of audio (0 seconds).
Sound Item Initial Volume for Fade-In: 0%
Note: If there are multiple (two or more) Fade-Ins or Fade-Outs in the Sound Item, the Quick Markers operations will operate on the first marker in the time line (left to right, closest to the start of audio).