Matrix Mic & Player : User's Guide
 Contents
 Language
 Product Home
Quick Start
 Page Bottom
Just the Basics
What are Output Groups?
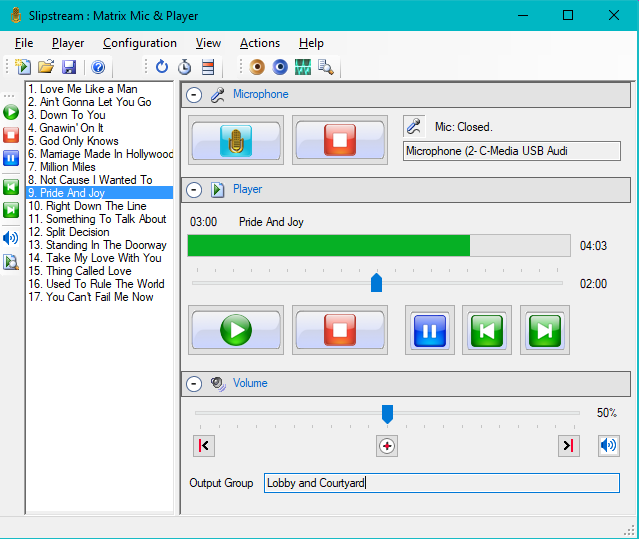
The first time you start Matrix Mic it will scan the computer hardware for input devices (microphones) and output devices (audio sound cards / speakers). It will create Output Groups -- one for each output Device and one group that contains all output Devices. Each Output Group specifies one or more speaker zones (Devices) you want to broadcast to. For example, an Output Group could specify that sound should be targeted to the Lobby PA AND the Courtyard PA simultaneously. You can add more Output Groups as desired to designate differnet combinations of Target Devices.
 To Page Top
Microphone Broadcasting

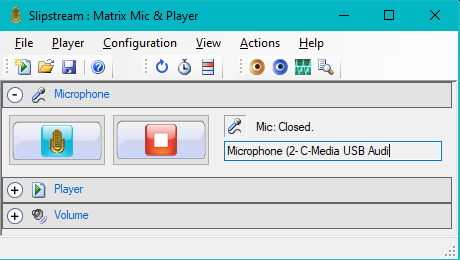
Microphone settings are found in the Configuration > Microphone/Line-In menu. Use the buttons on the Microphone controls panel (Figure 2) to operate the Mic.
- Pick microphone- Pick the microphone you want to use as the input Device from the Select Microphone/Line-In menu item. Or any audio player (ex. an MP3 Player) could be connected to a Line-In jack on the soundcard as well.
- Pick output group- Pick an Output Group from the Configuration > Output Group > Select Current Output Group menu. The Output Group specifies which zones (Speaker Devices) you want to broadcast to.
- Start Broadcast- Now click the Start Broadcast button and begin speaking into the microphone. Your announcement will be piped to each Device specified in the selected Output Group. You may need to adjust Mic Latency and Mic Output Format the first time you use the mic.
- Stop Broadcast- Click the Stop Broadcast button to stop broadcast.
Audio Player
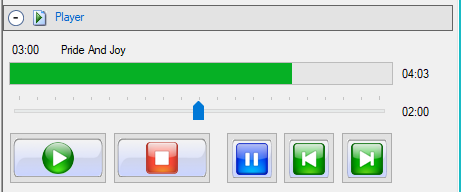
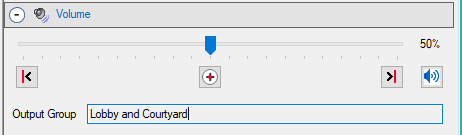
The Player will play a sequential Playlist of audio files to the current selected Output Group. The current Output Group is always listed under the Volume trackbar (Figure 5). Player settings are found in the Player menu. The Player is operated with the buttons on the Player controls panel (Figure 3) or the Player tool bar buttons.
-
Add Audio Files - See the Notes on Supported Audio File Formats.
- Click File > Open M3U Playlist. This will Replace the list of existing audio files, if any.
- Drag and drop from any file manager (ex. Windows Explorer) one or multiple M3U Playlists or audio files (mp3, wav, wvm, etc). This will Add To the existing audio list, if any.
- Pick output group- Pick an Output Group from the Configuration > Output Group > Select Current Output Group menu. The Output Group specifies which zones (Devices) you want to pipe the audio to.
- Play - Now click the Play button. The audio will be piped to each Device specified in the selected Output Group. You can Pause and Resume play as needed. Click the Previous or Next buttons to move forward or backward in the playlist.
- Stop- Click the Stop button to stop play.
- Save Playlist - Click File > Save to save your Playlist for future use. (saved as a standard M3U file)
Altering Player Behavior
There are several Player settings available to alter the Player behavior.
More Advanced Playback Control
If you need more advanced playback control and features than are offered by Matrix Mic , please take a closer look at our Sound Mill product.
Volume Settings
Step 1: Volume of Speaker Systems
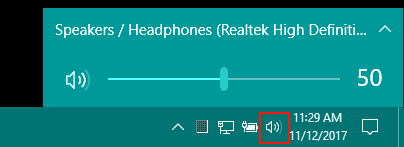
First set the maximum volume of each speaker system from with the Windows Taskbar Speakers icon (Figure 4). Each speaker system can have its own volume.
Setting this volume too high can potentially cause distortion during audio playback. The best way to test this is to add an audio file to the Matrix Mic player, set the Matrix Mic Volume to 100%, then adjust to the Windows Speakers system volume to the appropriate volume for the room.
Step 2: Matrix Mic Volume
The Matrix Mic Volume control trackbar (Figure 5) will set the playback/microphone volume to a percentage of the full volume of the speaker system (set in Step 1).
Volume Controls
There are quick set buttons for: Minimum Volume, Mid Volume, Maximum Volume (0%, 50%, 100%) and Mute Toggle (On/Off).
You can drag the Volume trackbar with the mouse. Or you can use keyboard keys to adjust the volume. Left/Right, Up/Down Arrow keys make a small change to the volume. PgUp and PgDn keys make a large change.