
 IPC Connect : User's Guide
 Contents
 Language
 Product Home
IPC: Inter-Process Communications
 Page Bottom
IPC Overview
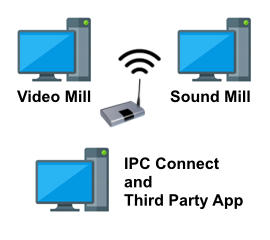
Note: Video Mill and Sound Mill can communicate with each other directly WITHOUT the use of the IPC_Connect app. IPC_Connect is specifically for use by third party apps that need to communicate with Video Mill and Sound Mill.
IPC (Inter-Process Communications) allows you to send commands between programs to syncronize operations. It does this by listening on a network IP Port Number for incoming messages via a network router (wired or wireless). You can send IPC commands (see command list below) from one program to the other (ex. RunScript 123). This allows you to synchronize audio and video programming with split second timing. The program that receives the command will execute the specified Script.
When Client Apps Reside on the Same Computer
In this case, a network router is NOT required for IPC. Use the standard Loopback IP Address (ie 127.0.0.1) to setup of the IPC clients.
When Client Apps Reside on different Computers
In this case, a network router (wired or wireless) is required for IPC. Each computer is assigned its own unique IP address by the router. Use the unique IP address (ex. 10.0.0.2) for setup of the IPC clients. You can get the computers IP address by clicking IPC > View IPC Clients.
IPC Networking Example
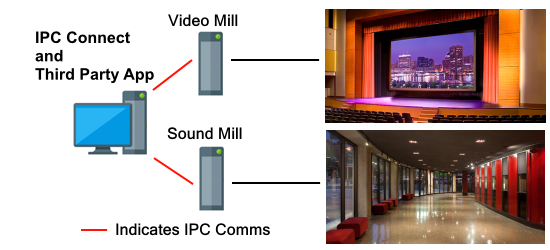
As an example (shown in Figure 2), a third party app (using IPC_Connect) can act as the master control computer to syncronize control of VideoMill to play video/images on the stage video display screen; And to control SoundMill to play audio on the lobby speaker system. How the system is designed is completely up to you and the IP network available at the venue. There is virtually no limit on the number of Apps you can network together.
 To Page Top
Set-up Basics
The following are the basic set-up steps to use IPC.
-
IPC Client Profiles - The program initially creates several IPC Client Profiles using the factory default settings.
- Origin Client - This defines the IP address and Port Number that the program will listen to on the local machine.
- Remote Client(s) - These clients define the the IP address and Port Number that each remote program will be listening to (Video Mill, Sound Mill, etc). You will create one Remote Client for each program that you will send/receive messages to/from. You should just delete any Remote Clients you do not plan to use.
- Pick a Default IPC Remote Client - Some operations (ex Ping) use the Default Remote Client.
- Start IPC - After completing the configuration steps above, you will start the programs on both (all) computers, then Start IPC in each program. Then test the configuration.
IPC Controls - Menu Items
Menu Locator: IPC
- Start IPC - Starts and initializes IPC network connections. IPC is always started on IPC_Connect when the program is started. If IPC is currently running, this will Stop then Restart IPC to reinitialize it. IPC must be started on all Client programs before the program can send or receive messages. This will initialize an IPC Sender and Receiver for the program based the IPC Client Profiles.
- Stop IPC - Stops IPC and releases network connections and resources.
- View IPC Status - Pops up a summary of current status of IPC connections and IPC Client Profile settings. This does some error checking as well.
- Send Adhoc IPC Command - See section below.
- Edit IPC Origin Client Profile - Opens the IPC Client Profile Editor (see below) to edit the Origin Client profile.
- Manage IPC Remote Client Profiles - Allows you to Add, Remove and Edit Remote Client profiles. Remove any Remote Clients for programs you are not using.
- IPC Clients Reset - This deletes ALL Client Profiles. Then creates an Origin client and multiple Remote clients set with factory default settings.
- View IPC Clients - Shows a summary of all of Clients configurations (IP addresses, ports, etc).
- View IPC Log - Shows the running log of IPC commands sent and recieved, plus errors when encountered. Useful debugging tool.
- Show Current IPC Status - Shows IPC status (started or stopped) and current default remote client (on the bottom status bar).
Remote Tools
- Select Default Remote Client - Selects the Remote IPC Client that you want to use as the Default Remote Client.
- Ping Remote Client - Pings the Default Remote Client to see if the IPC connection is working between IPC_Connect and the Remote Client. Results are shown on the status bar. The Remote Client needs to be started and have its own IPC started for Ping to report success.
IPC toolbar
- IPC toolbar - Buttons (from left to right): Start IPC, Stop IPC, Send Adhoc IPC commands, View IPC status detail, View IPC Log, Reset IPC Log, Show Current IPC Status

Remote Tools toolbar
- Remote Tools toolbar - Buttons (from left to right): Select Default Remote Client, Ping Remote Client.

IPC Commands and Syntax
See the separate help page for a complete list of IPC Commands and Syntax.
Methods for Sending IPC Commands
See the separate help page for a complete details of Methods for Sending IPC Commands .
How IPC Works
 Tutorial Video
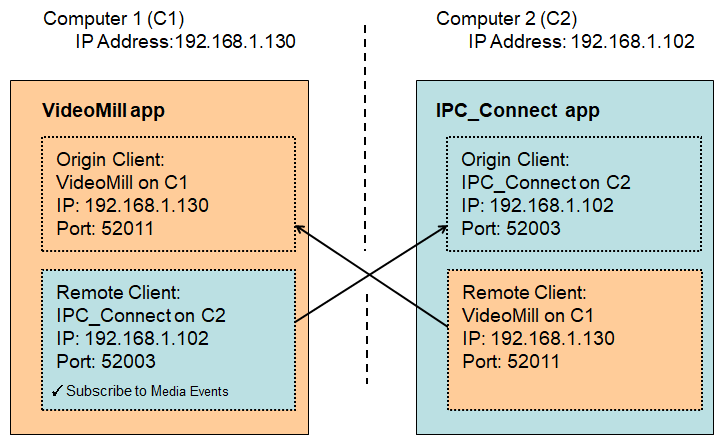
IPC must be Started on both programs for IPC to work. Figure 4 shows the basic configuration used to send a command from one program to another program using the Remote Client profile.
All IPC commands sent and received are logged to the IPC Log. You can encrypt the message traffic that goes across the network. If one client uses encryption , then all remote clients must use encryption (and the same encryption password) which is set in the IPC Options.
- Origin Client - Defines the network IP address of the computer the program is running on and the chosen Port Number that the program will listen on. The Origin IP Address is always the same as the local computer's Private Network IP address.
- Remote Client - Defines the network IP address and Port Number of the remote program that commands will be sent to. There must be one Remote Client profile for each remote program that you want to send/receive commands to/from.
Remote Media Manager (RMM) Remote Client
RMM needs to receive Media Events to operate correctly. Some IPC commands such as Play or RunScript will report Media Events back to the client that sends the command. Media Events included "Media Start" and "Media Stop". See MediaEvent IPC command syntax. If you want a Remote Client to receive these MediaEvent replies, check the 'Subscribe To Media Events' checkbox. VideoMill and SoundMill ignore Media Events, so do NOT check this checkbox for their remote clients.
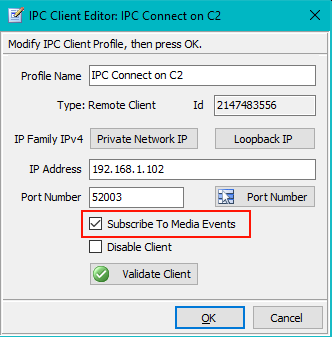
IPC Client Profile Editor
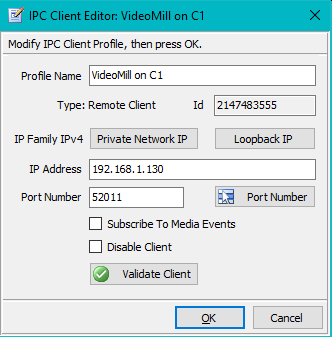
The IPC Client Profile Editor (Figure 5,6) allows you to configure the Client Profiles. After edits are made, you need to Restart IPC for edits to take effect (Use Start IPC to restart).
Client Profile Settings
- Profile Name - A name that logically identifies the Profile. Used for menu selection so keep it short and descriptive.
- IP Address - This is the network IP Address of the computer that the program is running on. See the difference between Private Network IP and Loopback IP below. External Internet IP addresses may also work depending on your firewall settings, but only if you have a special need. The Private Network IP is the far preferred IP to use for security and speed reasons.
- Port Number - Sound Mill and Video Mill each "Listen" for IPC incoming commands on a designated network Port Number.
-
Subscribe To Media Events - Video Mill and Sound Mill can automatically send media events to Remote Clients. When configuring the IPC_Connect Remote Client (Figure 6) in either Video Mill and Sound Mill, remember to check this checkbox. IPC_Connect may or may not need visibility to these events depending on what your Third Party app needs to do. If you have developed your own custom Remote Client that implements IPC, you may also want to subscribe to these events.
A MediaEvent IPC command is sent to subscriber clients (see MediaEvent in the IPC Commands section for syntax).
Media events include: Media Started and Media Stopped (or ended). - Disable Client - When checked, this client will NOT be included when you start IPC. Panel background is darkened when Disabled as a visual aid.
Editor Buttons
- Private Network IP - This button gets the computer's Private Network IP (IP assigned by the router). Computer must be connected to the router (cabled or wireless) for this action to work. If this button fails, you can open a Windows Commmand Prompt and enter "ipconfig /all". Look for the IPv4 Address (or IPv6 if you are using IPv6 address mode).
- Loopback IP - This will set the IP Address to the standard Loopback IP Address (ie 127.0.0.1). ONLY use this when you have the program's Origin Client and Remote Client(s) running on the same computer. It eliminates the need to have a network router. In ALL other cases, use the local Private Network IP address. Loopback IP address provides a small performance increase for message transfer because it bypasses the system network transaction layer.
- Port Number - Pops up a selection list to pick one of the Default Port Numbers listed below. Also sets the Profile Name based on the selection.
- Validate Client - Checks all inputs for valid syntax and values. Some errors will not be detected until IPC is started.
Router Setup and Network IP Addresses
Some routers allow you to lock the assignment of a specific Private Network IP Address to a specific computer connected to its network. So when the router is restarted, it will assign the same IP address to that computer. This is a good method to avoid having to make changes to your IPC client profiles due to router changing IP address assignments. If the Private Network IP Address for a computer changes by router reassignment, you will need to make changes to your IPC clients to reflect the IP address changes.
About Port Number
For simplicity you should be consistent when assigning Port Numbers to clients. Below are the default values, but if these ports conflict with another program on your computer, you can pick different numbers. Valid ports are any number between 49152 to 65535. Here is how to see what ports are in use on your computer.
Default Port Numbers
- Video Mill - 52011.
- Sound Mill - 52010.
- Remote Media Manager - 52002.
- FreeStyler Portal - 52012.
- IPC_Connect - 52003.
See previous section "How IPC Works" for an example of how to configure the Origin and Remote clients.
Testing IPC Configuration
You should always test the IPC connections before show time. (hint: use the Ping function for quick testing)
The first time you connect to a new network, the network firewall may pop up a challenge dialog asking you to Allow the program to send network messages. To test the IPC Configuration, first Start IPC on both (all) Video Mill and Sound Mill instances. Pick your default Remote Client by IPC > Select Default Remote Client. Then click IPC > Ping Remote Client. If all is working properly you will get a status message saying "IPC is working on both clients".
IPC - Error Messages and Solutions
There are a few common error messages that may be reported. The Windows error messages may not be obvious in describing the error.
Always check the View IPC Status menu item when errors occur and the program session Log and the IPC Log may also report additional errors that may not show up on the program status bar.
Things to Check
- After fixing a Client Profile error, you can usually just restart IPC by clicking the Start IPC menu item.
- Is IPC started on both the Origin and Remote Client?
- Are the Port Numbers set correctly in the Client Profiles?
- Are the IP Addresses set correctly in the Client Profiles?
- When using encrypted messages, is the "Encrypt Messages" option set on all clients? Are all clients using the same encryption password?
Common Error Messages
-
Find any errors in the Client Profile and make corrections. Then restart IPC on any client where client changes were made.
-
IPC: Parm is not a valid command.
Message: IPC: Parm is not a valid command: rrM7MR7DBglXosgxPe+nJQA==.
Problem: Will occur when IPC Encrypt Messages option is set on the sender client but not on the receiver client. The unreadable string is encrypted data that was not decrypted upon receipt.
Solution: Ensure that the "Encrypt Messages" option set on all clients. Then restart IPC. -
Connection was forcibly closed
Message: An existing connection was forcibly closed by the remote host.
Problem: Will occur when IPC is not Started on the Remote Client.
Solution: Check the Port Number in the Remote Client Profile. And check to see if IPC is Started on the Remote Client. -
Invalid pointer address
Message: The system detected an invalid pointer address in attempting to use a pointer argument in a call.
Problem: Usually occurs when IPC is not started on the Remote Client; Or the port number is not correct.
Solution: Check the Port Number in the Remote Client Profile. And check to see if IPC is Started on the Remote Client. -
Address Incompatible
Message: An address incompatible with the requested protocol was used.
Problem: It's likely that one (or both) Client Profile(s) has an IP Addresses not consistent with the current addressing mode in use (IPV4 vs IPV6).
Solution: See which addressing mode in use (IPV4 or IPV6). Then check the Client Profile to see if they are using correct IP Addresses. -
End Point creation failed
Message: Remote Receiver End Point creation failed for: 0.0.0.0
Problem: The IP Address for the Remote Client Profile has an invalid value.
Solution: Update the IP Address.
Useful Windows Network Commands
Open a Windows Command Prompt window to run these command line tools. Go to Start > All Programs > Accessories > Command Prompt .
- Netstat - Netstat /a will list all active IP port connections on the computer.
- Ipconfig - Ipconfig /all will list all Windows IP Configurations for network attached devices on the computer. (includes device IP Address)
IPV4 vs IPV6 Considerations
Recommendation: We recommend that you use IPV4 addressing mode unless you have a critical reason to use IPV6. We found no noticible performance difference in our testing of these addressing modes. IPV4 IP Addresses are easier to recognize (fewer characters) so debugging configuation problems will be easier when using IPV4. IPV4 is the default factory setting.
If you change this setting, you will need to edit your clients to set new IP addresses.
IPC will run on both IPV4 and IPV6 networks. You can change the IP addressing mode in the Options (requires a program restart).
-
IPV4 vs IPV6 - Internet Protocol version 4 (IPV4) and version 6 (IPV6), are different specifications for representing an IP Address.
Example IP Addresses:
IPV4 20.0.0.9
IPV6 2001:0:83e8:3d2b:7a25:95fe:c862:2ea3 -
Loopback IP Address - This value is based on IP addressing mode:
IPV4 127.0.0.1
IPV6 ::1
Tech Notes
Things you don't need to know, but are provided for the extreme techies who want the details.
Terms
- IP Address - Internet Protocol address uniquely identifies a computer on a network.
- Loopback IP Address - Refers to the routing of messages back to the originating computer.
- Port Number - A Network end point. It must be unique port number for the computer.
- Network Address Translation (NAT) - Allows multiple devices to connect to a public network using the same public IP address.
Specifications
- IPC sends and receives UTF8 formatted text strings using network UDP (User Datagram Protocol) packets.
- NAT Traversal for the UDP Client instance is enabled on Windows 10/8/7/Vista but NOT Windows XP. NAT traversal may be provided using Teredo, 6to4, or an ISATAP tunnel. NAT traversal is not a supported feature (meaning it is not included in our test plan). But it should work based on Microsoft documentation.